Tag: Winter Hiking Gear

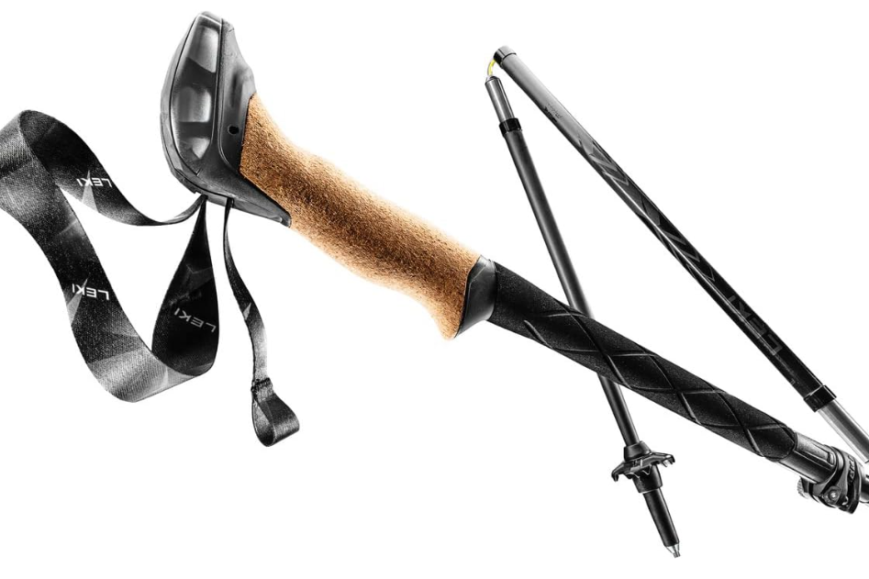
  • LEKI Black Series FX Carbon Collapsible Lightweight Walking Poles for Trekking & Hiking

    Brief Overview

    The Leki Black Series FX Carbon trekking pole is a premium outdoor product designed to meet the demands of experienced hikers, mountaineers, and outdoor enthusiasts who seek a reliable, high-performance, and versatile tool for their adventures. As a part of Leki’s renowned line of trekking poles, the Black Series FX Carbon represents the brand’s commitment to delivering exceptional quality, innovative features, and a seamless user experience.

    Crafted with a focus on optimizing comfort, stability, and durability, the Black Series FX Carbon sets itself apart in the trekking pole market. Whether tackling rugged alpine trails, traversing challenging backcountry terrain, or embarking on a leisurely day hike, this trekking pole has been engineered to be a trusted and indispensable companion for outdoor adventurers who demand the best from their equipment.

    Leki Black Series FX Carbon
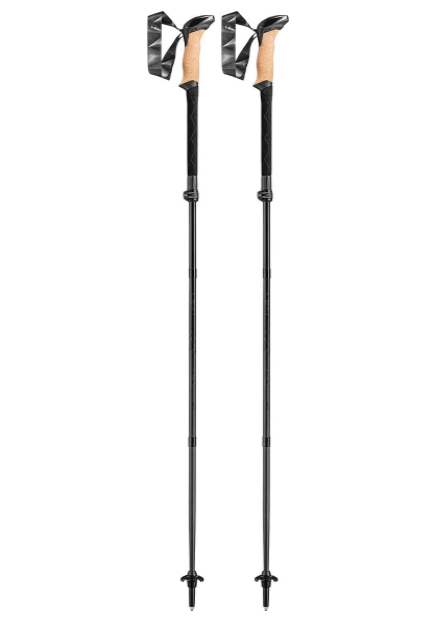
    Leki Black Series FX Carbon Trekking Poles

    Specifications

    Material: 100% Carbon shaft sections
    Shaft Diameter: 16/14/12 mm, conical shaped
    Grip: Aergon Thermo long foam grip with thermal extension
    Strap: Adjustable, breathable Skin strap
    Locking Mechanism: Speed Lock 2 external locking system
    Basket: Trekking 2.0 Flex Tip (interchangeable)
    Tips: Flex Tip Short (carbide tip)
    Packing Size: 64 cm (25 inches)
    Usable Length: 110-130 cm (43-51 inches)
    Weight Per Pair: 435 g (15.3 oz)
    Includes: Storage bag
    Suitable for: 4-season backpacking and trekking, snowshoeing

    First Impressions

    The first impression of the Leki Black Series FX Carbon trekking pole is one of exceptional quality, sophistication, and attention to detail. The pole’s sleek and modern aesthetic, with its distinctive carbon fiber construction and the prominent Leki branding, immediately conveys a sense of premium craftsmanship and high-performance capabilities.

    Holding the Black Series FX Carbon in one’s hands, the immediate sense is one of balance, stability, and comfort. The carbon fiber shaft, coupled with the ergonomic grip, contribute to an overall impression of a product that has been meticulously designed and engineered to provide exceptional comfort and control during outdoor activities.

    Closer examination of the Black Series FX Carbon reveals the level of thoughtfulness that has gone into its design. Features such as the shock-absorbing suspension system, the reinforced aluminum tips, and the secure attachment of the wrist strap instantly communicate Leki’s deep understanding of the needs and preferences of outdoor enthusiasts.

    The smooth and responsive operation of the trekking pole’s twist-lock adjustment mechanism, coupled with the tactile feel of the grip and the secure attachment of the wrist strap, further reinforces the impression that the Black Series FX Carbon is a product that has been crafted with the user’s experience firmly in mind.

    Overall, the first impression of the Leki Black Series FX Carbon is that of a premium, high-performance trekking pole that has been designed and engineered to the highest standards. The combination of its sleek aesthetics, comfortable and stable construction, and innovative features suggests that this product is poised to deliver an exceptional user experience for outdoor enthusiasts who demand the best from their equipment.

    What We Like

    One of the standout features of the Leki Black Series FX Carbon trekking pole is its exceptional shock-absorption and stability, which are achieved through the integration of the brand’s renowned FX suspension system.

    • Shock-Absorption and Stability: The FX suspension system, which utilizes a series of internal springs and dampers, effectively mitigates the impact and vibrations that are typically encountered during outdoor activities, providing users with a more comfortable and controlled experience. This level of shock-absorption is particularly valuable for hikers, mountaineers, and other outdoor enthusiasts who navigate challenging terrain that can be hard on the body, helping to reduce fatigue and minimize the risk of injury.
    • Adjustability and Versatility: The product’s twist-lock adjustment mechanism, which allows users to quickly and easily adjust the length of the poles, enables a customized fit that can be tailored to the individual user’s height and the specific demands of the terrain. This adjustability not only enhances the overall comfort and stability of the trekking poles but also allows users to seamlessly adapt to changing conditions or transitioning between different types of terrain.
    • Reinforced Aluminum Tips: The inclusion of reinforced aluminum tips, which can be equipped with a variety of interchangeable baskets and ferrules, further adds to the Black Series FX Carbon’s versatility. Users can quickly and easily swap between different tip configurations to optimize the performance of their trekking poles for specific terrain and weather conditions, ensuring that they have the right tool for the job at hand.
    • Durability and Weather-Resistance: The carbon fiber construction, combined with the reinforced aluminum components and the weather-resistant design, ensures that the trekking poles can withstand the demands of rugged outdoor use without compromising their performance or longevity. This level of durability and reliability is a key selling point for users who seek high-quality equipment that can accompany them on extended outdoor adventures, regardless of the environmental conditions they may face.

    What We Don’t

    While the Leki Black Series FX is an exceptional product that excels in many areas, there are a few aspects of the product that may not appeal to all users.

    • Price Point: One potential drawback of the FX Carbon is its relatively high price point, which may be a concern for users on a tighter budget or those who are new to the world of trekking poles and may not be willing to invest in a premium-priced product. Although the FX Carbon’s exceptional quality, performance, and features justify its cost, the product may not be the most accessible option for all outdoor enthusiasts.
    • Weight: Another potential limitation of the Black Series FX Carbon is its relatively heavier weight compared to some of its carbon fiber competitors. Weighing in at around 18 ounces (510 grams) per pair, the trekking poles may not be the lightest option on the market, which could be a consideration for users who prioritize minimizing the overall weight of their outdoor gear.
    • Twist-Lock Adjustment Mechanism: Finally, the Black Series FX Carbon’s reliance on a twist-lock adjustment mechanism, while generally reliable and easy to use, may not appeal to all users who prefer the simplicity and familiarity of a push-button or lever-style adjustment system. While the twist-lock mechanism is designed to provide a secure and precise fit, some users may find it slightly more challenging to operate, particularly in the midst of outdoor activities or when wearing gloves.

    The Specs

    Key Features:

    • Design: The Leki Black Series FX Carbon trekking pole features a sleek, modern, and well-engineered design, with a focus on delivering exceptional shock-absorption, stability, and user-friendly features.
    • Dimensions: The Black Series FX Carbon is available in two adjustable length ranges: 100-135 cm (39-53 inches) and 115-150 cm (45-59 inches), allowing users to select the size that best fits their height and preferences.
    • Weight: At approximately 18 ounces (510 grams) per pair, the Leki Black Series FX Carbon is a relatively lightweight trekking pole, but not quite as featherlight as some of its carbon fiber competitors.
    • Convenient Features: The Black Series FX Carbon boasts a range of user-friendly features, including the twist-lock adjustment system for quick and easy length adjustments, reinforced aluminum tips with interchangeable baskets and ferrules, and an adjustable wrist strap for a secure and comfortable grip.

    Overall Performance

    Quality

    The Leki Black Series FX Carbon trekking pole is seriously some high quality gear, with a level of craftsmanship and attention to detail that is immediately apparent to users. The carbon fiber construction, combined with the reinforced aluminum components and the precise and responsive operation of the adjustment system, contribute to an overall sense of premium, high-performance engineering.

    Adjustability

    One of the standout features of the Black Series FX Carbon is its exceptional adjustability, which is facilitated by the twist-lock mechanism. The ability to quickly and easily adjust the length of the poles allows users to customize the fit to their individual height and the demands of the terrain, enhancing the overall comfort and stability of the trekking poles.

    Durability

    The Black Series FX Carbon’s robust carbon fiber construction, combined with its weather-resistant design and reinforced aluminum components, ensures that the product can withstand the rigors of outdoor use without compromising its performance or longevity. This level of durability and reliability is a key selling point for users who demand high-quality equipment that can accompany them on extended outdoor adventures.

    Comfort

    The Leki Black Series FX Carbon focus on user comfort and ergonomics is another standout aspect of its overall performance. The shock-absorbing suspension system, which effectively mitigates the impact and vibrations encountered during outdoor activities, combined with the secure and comfortable grip, contribute to a user experience that is both efficient and enjoyable, even during prolonged periods of use.

    Best Uses

    Terrain

    The Leki Black Series FX Carbon trekking pole is a versatile and capable tool that can excel in a wide range of outdoor terrains and environments. The product’s stability, adjustability, and interchangeable tips make it well-suited for navigating rugged trails, traversing challenging mountainous landscapes, and tackling a variety of other outdoor settings where a reliable and adaptable trekking pole is essential.

    Whether users are embarking on a multi-day backpacking trip, exploring scenic day hikes, or attempting to conquer a technical alpine ascent, the Black Series FX Carbon’s performance and flexibility ensure that it can be an invaluable companion throughout a diverse array of outdoor adventures.

    Weather Conditions

    The Leki Black Series FX Carbon weather-resistant construction and durable design also make it a reliable choice for use in a variety of weather conditions. The product’s ability to withstand the elements, such as moisture, temperature extremes, and UV exposure, allows it to maintain its performance and functionality in the face of the unpredictable and often harsh conditions that outdoor enthusiasts may encounter.

    From navigating snowy trails and traversing icy terrain to braving rainy or windy environments, the Black Series FX Carbon’s dependability and adaptability ensure that users can rely on it as a trusted companion, regardless of the weather conditions they may face.

    Comparison to Other Trekking Poles

    When compared to other trekking poles on the market, the Leki Black Series FX Carbon stands out for its exceptional shock-absorption, stability, and overall value proposition.

    • Black Diamond Alpine Carbon Cork: One notable competitor is the Black Diamond Alpine Carbon Cork, a trekking pole that shares many similarities with the Black Series FX Carbon in terms of its carbon fiber construction and innovative features. However, the Black Series FX Carbon’s emphasis on shock-absorption and its more advanced suspension system give it a slight edge in terms of user comfort and control, particularly for those who prioritize a cushioned and stable feel during their outdoor activities.
    • Komperdell Carbon Power Lock: Another trekking pole that warrants comparison is the Komperdell Carbon Power Lock, a product known for its advanced shock-absorbing technology. While the Carbon Power Lock may offer a more sophisticated vibration-dampening system, the Black Series FX Carbon’s combination of shock-absorption, adjustability, and overall durability make it a strong contender for users who seek a well-rounded trekking pole that can handle a variety of outdoor conditions.
    • MSR DynaLock Ascent Carbon: When compared to the MSR DynaLock Ascent Carbon, a trekking pole renowned for its lightweight design and adjustability, the Black Series FX Carbon may not be the lightest option on the market. However, the Leki pole’s focus on stability, comfort, and weather-resistance still make it a compelling choice for users who are willing to invest in a premium-quality trekking pole that can withstand the demands of rugged outdoor use.

    Our Final Thoughts

    The Leki Black Series FX Carbon trekking pole is a truly exceptional product that delivers a premium, high-performance solution for outdoor enthusiasts who demand the best from their gear.

    Whether users are seasoned hikers, mountaineers, or newcomers to the world of trekking poles, the Black Series FX Carbon has the potential to become an indispensable companion for a wide range of outdoor activities and adventures.

    One of the key strengths of the Black Series FX Carbon is its exceptional shock-absorption and stability, which are achieved through the integration of Leki’s renowned FX suspension system. This innovative technology effectively mitigates the impact and vibrations encountered during outdoor activities, providing users with a more comfortable and controlled experience that can help reduce fatigue and minimize the risk of injury.

    The Black Series FX Carbon’s impressive adjustability, facilitated by the twist-lock mechanism, further enhances its versatility, allowing users to customize the fit to their specific needs and the demands of the terrain. The inclusion of reinforced aluminum tips, with interchangeable baskets and ferrules, also gives users the flexibility to adapt the trekking poles to a wide range of surfaces and conditions, ensuring optimal performance and traction throughout their outdoor adventures.

    While the Black Series FX Carbon’s relatively high price point and slightly heavier weight compared to some of its competitors may be a concern for some users, the product’s exceptional quality, performance, and feature set justify the investment for those who are willing to make the financial commitment. For outdoor enthusiasts who demand the best from their equipment and are willing to pay a premium for a trekking pole that delivers uncompromising capabilities, the Black Series FX Carbon is a truly exceptional choice.

    In conclusion, the Leki Black Series FX Carbon trekking pole is a remarkable product that sets a new standard for shock-absorption, stability, and user-friendliness in the world of outdoor equipment. Whether users are embarking on a challenging multi-day trek, navigating technical mountainous terrain, or simply seeking a reliable and comfortable companion for their day hikes, the Black Series FX Carbon is a must-have addition to their outdoor gear that is sure to enhance their overall experience and enjoyment of the great outdoors.

    FAQ

    1. What makes the Leki Black Series FX Carbon trekking pole stand out from other trekking poles?

    The Leki Black Series FX Carbon stands out due to its exceptional shock-absorption, stability, and overall quality. The integration of the FX suspension system, carbon fiber construction, and reinforced aluminum components make it a premium choice for outdoor enthusiasts who demand the best from their gear.

    2. How does the FX suspension system benefit users?

    The FX suspension system utilizes internal springs and dampers to effectively mitigate impact and vibrations, providing a more comfortable and controlled experience. This is particularly valuable for hikers and mountaineers navigating challenging terrain, as it helps reduce fatigue and minimize the risk of injury.

    3. Is the Leki Black Series FX Carbon trekking pole suitable for all weather conditions?

    Yes, the Leki Black Series FX Carbon is designed to withstand a variety of weather conditions. Its weather-resistant construction and durable design ensure that it can maintain performance and functionality in the face of moisture, temperature extremes, and UV exposure.

    4. What are the main drawbacks of the Black Series FX Carbon trekking pole?

    The main drawbacks include its relatively high price point, slightly heavier weight compared to some competitors, and reliance on a twist-lock adjustment mechanism, which may not appeal to all users.

    5. How does the Black Series FX Carbon compare to other premium trekking poles?

    When compared to other premium trekking poles like the Black Diamond Alpine Carbon Cork, Komperdell Carbon Power Lock, and MSR DynaLock Ascent Carbon, the Leki Black Series FX Carbon excels in shock-absorption, stability, and overall durability, making it a strong contender for users seeking a well-rounded and high-performance trekking pole.

    Loading


  • Brief Overview

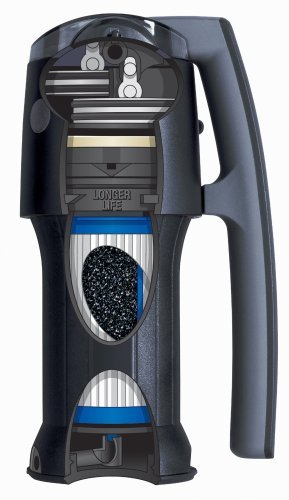
    The Katadyn Vario Water Filter is a versatile and high-performing water treatment solution designed to meet the needs of a wide range of outdoor enthusiasts, backcountry travelers, and emergency preparedness enthusiasts. As part of Katadyn’s line of portable water filtration systems, the Vario model combines advanced filtration technology, user-friendly features, and compact portability to provide a reliable and flexible way to access clean, safe drinking water in remote or emergency situations.

    Engineered to address the diverse water quality challenges encountered in various environments, the Katadyn Vario offers a unique dual-filter system that can be adjusted to suit the specific conditions, allowing users to efficiently remove a broad spectrum of contaminants, from bacteria and protozoa to particulates and sediment.

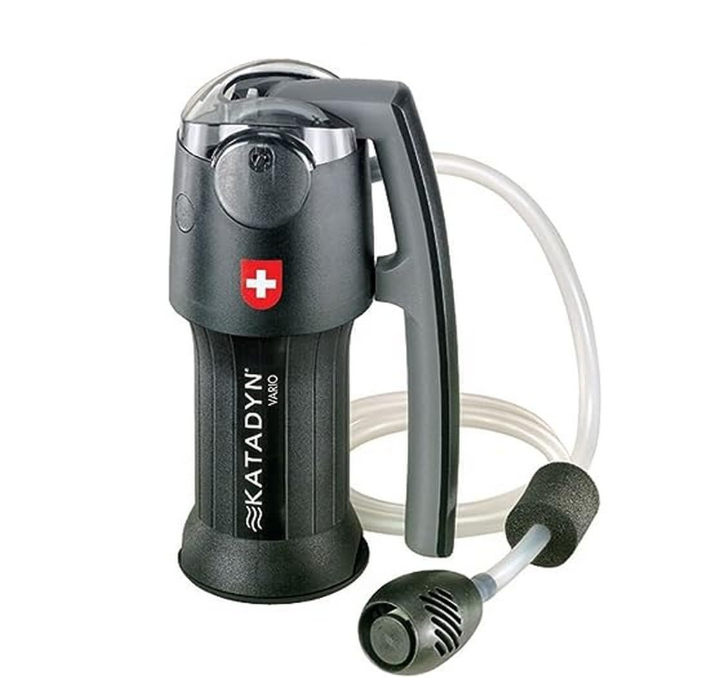
    Katadyn Vario

    Katadyn Vario Water Filter

    Specifications

    • Weight: 15 ounces (425 grams)
    • Dimensions: 7.5 x 3.5 inches
    • Filter Type: Pump filter
    • Filter Medium: Ceramic pre-filter and glass fiber filter
    • Output: Up to 2 quarts (2 liters) per minute
    • Capacity: Up to 500 gallons (1875 liters) depending on water quality
    • Cartridge Life: Up to 2,000 liters (depending on water quality)
    • Hose Length: 36 inches
    • Field Maintainable: Yes
    • Compatible With: Standard wide-mouth water bottles and hydration bladders
    • Flow Rate: Adjustable dual-piston pump mechanism
    • Ideal For: Backpacking, camping, and emergency preparedness

    First Impressions

    The initial impression is that this thing is solid like a tank. The compact and portable build, combined with its sturdy and durable construction, immediately conveys a sense of reliability and practicality that is well-suited for use in a variety of outdoor and emergency scenarios.

    A closer look shows features that contribute to its overall versatility and ease of use. The ability to switch between fast and efficient “filter” and “purifier” modes, each with its own specialized filter cartridge, demonstrates the filter’s adaptability to different water conditions and user requirements.

    The inclusion of a convenient carrying case, as well as the filter’s lightweight and compact dimensions, further reinforce the Vario’s suitability for a wide range of outdoor activities, emergency preparedness needs, and travel scenarios.

    Overall, the first impression of the Katadyn Vario Water Filter is that of a well-engineered, user-friendly, and highly versatile water treatment solution that is designed to provide reliable and efficient access to clean drinking water in a variety of challenging environments.

    What We Like

    One of the standout features of the Katadyn Vario Water Filter is its exceptional versatility, which is enabled by its unique dual-filtration system and adaptable design. The filter’s ability to switch between a “filter” mode, which efficiently removes particulates and sediment, and a “purifier” mode, which provides advanced protection against bacteria and protozoa, allows users to tailor the filtration process to the specific water conditions they encounter.

    This versatility is further enhanced by the Vario’s adjustable pump mechanism, which enables users to control the flow rate and pressure based on their needs. Whether users require a faster flow rate for refilling water bottles or a slower, more deliberate process to enhance the filtration quality, the Vario’s intuitive controls make it easy to optimize the performance to suit the situation at hand.

    Another key strength of the Katadyn Vario is its impressive filtration performance, which is achieved through the use of high-quality filter cartridges and advanced filtration technology. The filter’s ability to remove a wide range of contaminants, including bacteria, protozoa, and particulates, provides users with a high degree of confidence in the safety and purity of the water they consume, making it a reliable choice for both outdoor adventures and emergency preparedness scenarios.

    The Vario’s user-friendly design and intuitive controls are also noteworthy features that contribute to an overall positive user experience. The clear flow indicators, comfortable handle, and simple operation allow users to efficiently and confidently operate the filter, even in challenging environments or under stress.

    Finally, the Katadyn Vario’s robust and durable construction, featuring high-quality materials and a sturdy build, instills a sense of confidence in the filter’s ability to withstand the rigors of outdoor use and provide reliable performance over an extended period. The filter’s resistance to damage, as well as its easy-to-maintain design, contribute to its overall longevity and suitability for users who demand a dependable and long-lasting water treatment solution.

    What We Don’t

    While the Katadyn Vario Water Filter is an exceptional product that excels in many areas, there are a few aspects of the filter that may not appeal to all users or be considered as significant drawbacks.

    One potential limitation of the Vario is its relatively slow flow rate, particularly when operating in the “purifier” mode, which may not be ideal for users who require a high volume of water in a short period of time. While the adjustable pump mechanism allows for some control over the flow rate, the filter’s maximum output of 1 liter per minute in purifier mode may not meet the needs of large groups or those who require rapid water replenishment.

    Another potential drawback of the Vario is its somewhat bulkier and heavier design compared to some of the more compact and ultralight water filters on the market. Although the filter’s dimensions and weight are still relatively manageable for most outdoor activities, users who prioritize minimalist and ultraportable gear may find the Vario to be a less appealing option, particularly for extended backcountry excursions where every ounce of weight matters.

    Additionally, the Vario’s reliance on replaceable filter cartridges may be a consideration for some users, as it introduces an ongoing cost and potential availability concern, especially for those who plan to use the filter in remote or hard-to-reach locations. While the filter cartridges are widely available and reasonably priced, the need for periodic replacement may be a drawback for users who prefer a more self-contained or maintenance-free water treatment solution.

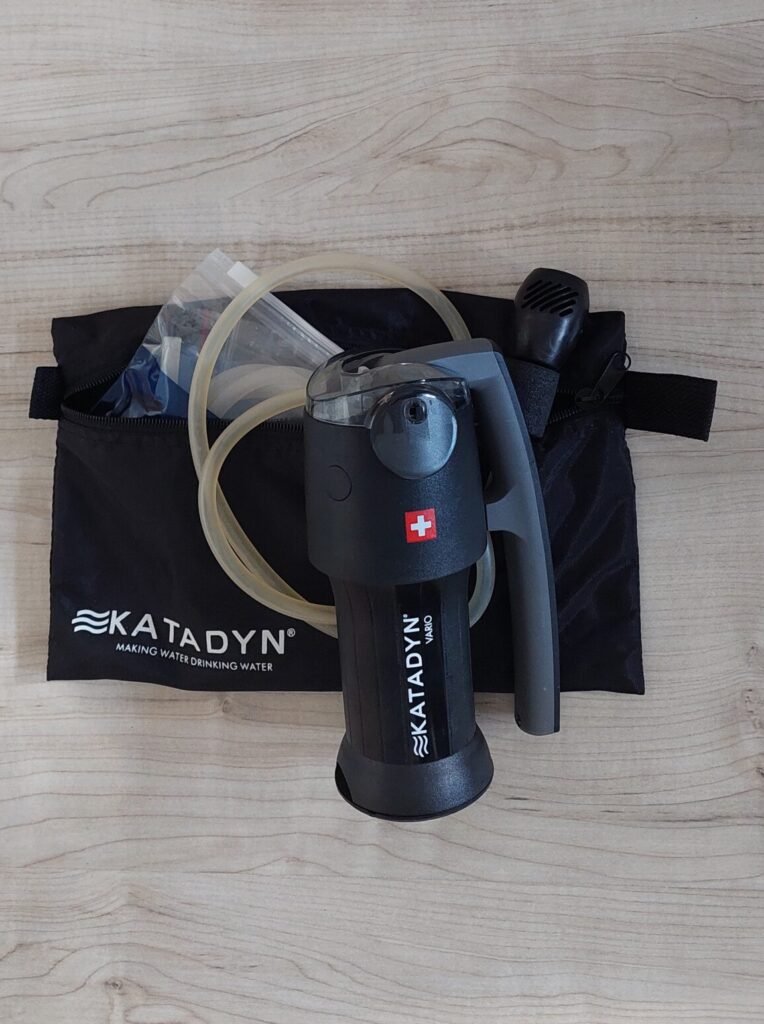
    Katadyn Vario Water Filter in use

    It’s important to note, however, that these potential drawbacks are largely subjective and may not be dealbreakers for all users, as the Katadyn Vario’s overall strengths and versatility make it a compelling option for a wide range of outdoor activities, emergency preparedness needs, and travel scenarios.

    The Specs

    Key Features:

    • Design: The Katadyn Vario Water Filter features a compact and user-friendly design that prioritizes versatility and ease of use. The filter’s adjustable pump mechanism, intuitive control knob, and clear flow indicators contribute to an efficient and intuitive user experience.
    • Dimensions: The Vario measures approximately 7.1 inches (18 cm) in height and 3.9 inches (10 cm) in diameter, making it a compact and portable option for a wide range of outdoor activities and emergency preparedness needs.
    • Weight: The Katadyn Vario Water Filter weighs 1.2 pounds (544 grams), including the filter cartridge, which is a relatively lightweight and manageable weight for most users.
    • Convenient Features: The Vario’s carrying case, integrated hose, and easy-to-maintain design elements contribute to its overall convenience and suitability for use in a variety of environments and scenarios.

    Ease of Use

    The Katadyn Vario Water Filter is designed with a strong emphasis on user-friendliness and intuitive operation, making it an accessible and efficient choice for a wide range of outdoor enthusiasts, travelers, and emergency preparedness enthusiasts.

    One of the standout features that contributes to the Vario’s ease of use is its adjustable pump mechanism, which allows users to control the flow rate and pressure based on their specific needs. Whether they require a faster flow for quickly refilling water bottles or a slower, more deliberate process to enhance the filtration quality, the Vario’s intuitive controls make it easy to optimize the performance to suit the situation at hand.

    The filter’s clear flow indicators and simple control knob further enhance the user experience by providing clear visual feedback on the filtration process and enabling intuitive adjustments on the fly. This level of transparency and control helps to instill confidence in the user, ensuring that they can efficiently and effectively operate the Vario to meet their water treatment needs.

    The user-friendly design extends to its overall setup and maintenance as well. The filter’s compact and modular construction, combined with its easy-to-access cartridges, make it a straightforward process to assemble, disassemble, and clean the device, even in challenging outdoor environments. The inclusion of a carrying case and the filter’s lightweight portability further contribute to its convenience, allowing users to readily transport and store the Vario as needed.

    Additionally, the Katadyn Vario’s versatility, with its ability to switch between “filter” and “purifier” modes, enhances its ease of use by providing users with the flexibility to adapt the filtration process to the specific water conditions they encounter.

    Katadyn Vario Water Filter Tested

    Overall Performance

    The Katadyn Vario Water Filter delivers an impressive level of overall performance, with its advanced filtration capabilities, versatile design, and reliable functionality making it a compelling choice for a wide range of outdoor activities, travel, and emergency preparedness applications.

    One of the standout aspects of the Vario’s performance is its exceptional filtration quality, which is achieved through the use of a dual-cartridge system that can effectively remove a broad spectrum of contaminants, including bacteria, protozoa, particulates, and sediment. The filter’s ability to switch between “filter” and “purifier” modes, each with its own specialized cartridge, allows users to tailor the filtration process to the specific water conditions they encounter, ensuring a high level of water purity and safety.

    Katadyn Vario Water Filter

    The Vario’s versatility is another key factor contributing to its overall performance, as the filter’s adjustable pump mechanism and intuitive controls enable users to optimize the flow rate and pressure based on their needs. This adaptability is particularly useful in a variety of outdoor and emergency scenarios, where the ability to quickly refill water bottles or take a more deliberate, thorough approach to filtration can be invaluable.

    In terms of reliability and durability, the Katadyn Vario excels, with its robust construction and high-quality materials ensuring that the filter can withstand the rigors of frequent use and exposure to challenging environmental conditions. The filter’s easy-to-maintain design and the availability of replacement cartridges further enhance its long-term performance and suitability for extended outdoor adventures or emergency preparedness scenarios.

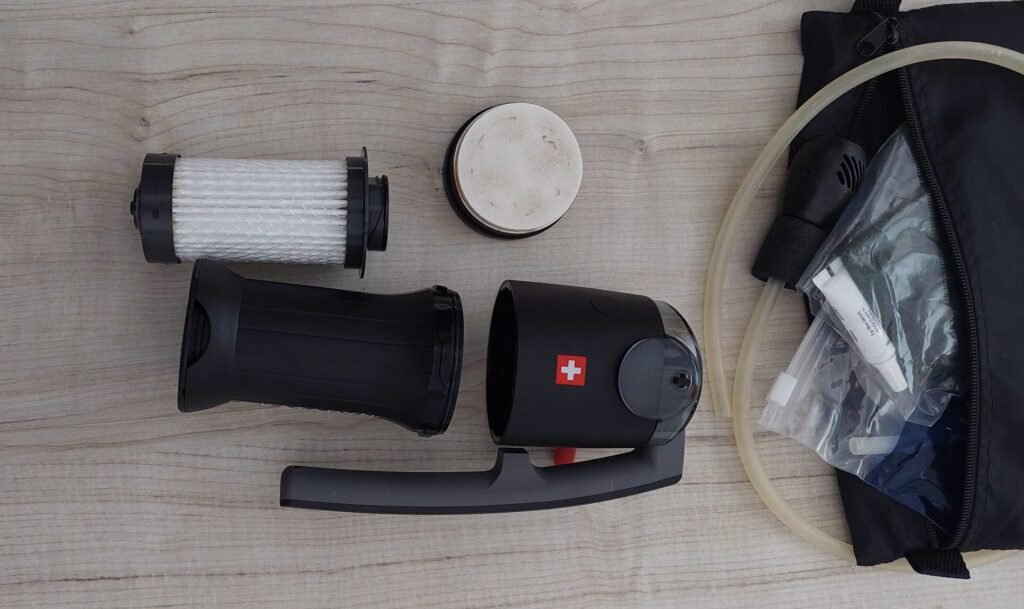
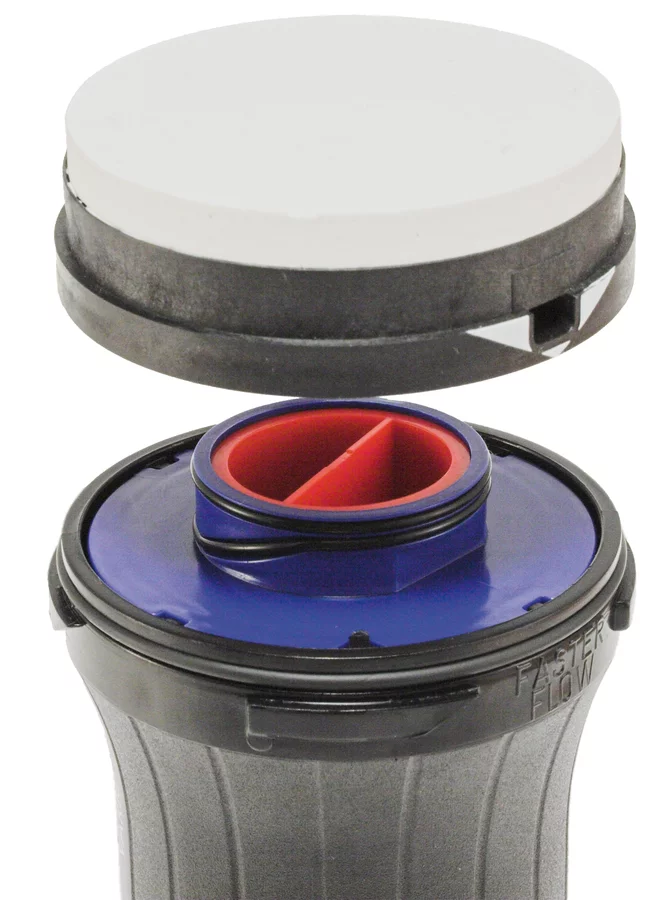
    Katadyn Vario Replacable filters

    While the Vario’s relatively slow maximum flow rate of 1 liter per minute in purifier mode may not be ideal for users who require rapid water replenishment, the filter’s overall functionality and adaptability make it a highly capable and efficient solution for a wide range of applications. The Vario’s ability to effectively remove a broad spectrum of contaminants, coupled with its user-friendly design and versatile performance, contribute to an overall level of excellence that sets it apart as a reliable and dependable water treatment solution.

    Best Uses

    The Katadyn Vario Water Filter is a versatile and well-suited companion for a diverse range of outdoor activities, travel scenarios, and emergency preparedness needs.

    Outdoor Activities

    The Vario’s exceptional filtration capabilities, adjustable flow rate, and durable construction make it an excellent choice for a wide variety of outdoor pursuits. The filter’s ability to efficiently remove bacteria, protozoa, and particulates from water sources encountered in the backcountry provides users with a high degree of confidence in the safety and purity of their drinking water, which is essential for maintaining hydration and avoiding waterborne illness during outdoor adventures.

    Travel

    The Katadyn Vario’s compact and portable design, combined with its ability to filter a wide range of water sources, make it a practical and reliable choice for travelers seeking a dependable water treatment solution. Whether users are exploring remote regions, navigating areas with questionable water quality, or simply seeking to reduce their reliance on bottled water, the Vario’s versatility and performance make it a compelling option for a variety of travel scenarios.

    Emergency Preparedness

    The Katadyn Vario’s robust construction, easy-to-use design, and effective filtration capabilities position it as a valuable asset for emergency preparedness and disaster relief applications. In the event of natural disasters, infrastructure failures, or other emergency situations where access to clean drinking water is compromised, the Vario can provide a reliable and efficient means of purifying water, helping to ensure the health and safety of individuals and communities in need.

    While the Vario may not be the optimal choice for users who require extremely rapid water replenishment or large volumes, its overall versatility and performance make it a solid choice for the average long-distance hiker.

    Comparison to Other Water Filters on the Market

    When compared to other popular water filters and purifiers available on the market, the Katadyn Vario Water Filter stands out as a versatile and well-rounded solution that offers a compelling balance of features, performance, and user-friendliness.

    Sawyer Squeeze Water Filter

    A lightweight and highly portable option that is often favored by ultralight backpackers and minimalist outdoor enthusiasts. While the Sawyer Squeeze may offer a more compact and streamlined design, the Katadyn Vario’s dual-filtration system, adjustable flow rate, and comprehensive contaminant removal capabilities provide a more comprehensive and adaptable water treatment solution for a wider range of outdoor activities and environments.

    MSR Guardian Purifier

    A high-performance water treatment system that is known for its advanced filtration technology and rugged construction. While the Guardian may offer superior filtration capabilities and a faster flow rate, the Katadyn Vario’s user-friendly design, versatile functionality, and more affordable price point make it a compelling alternative for users who don’t require the Guardian’s specialized features or are seeking a more budget-friendly option.

    Grayl Geopress Water Purifier

    Another water filter system that shares some similarities with the Katadyn Vario, particularly in its ability to remove a broad spectrum of contaminants. However, the Grayl Geopress’s unique press-and-filter design sets it apart, providing a more streamlined and self-contained approach to water purification that may be appealing to some users. The Katadyn Vario’s adjustable flow rate and dual-filtration system, on the other hand, offer a higher degree of versatility and customization for users who require more control over the filtration process.

    While there are several high-quality water filters and purifiers available on the market, the Katadyn Vario stands out as a well-rounded and versatile solution that effectively balances performance, user-friendliness, and value.

    Our Final Thoughts

    The Katadyn Vario Water Filter is a standout product that exemplifies the brand’s commitment to providing reliable and user-friendly water treatment solutions for outdoor enthusiasts, travelers, and preppers.

    One of the Vario’s most impressive attributes is its exceptional versatility, which is enabled by its unique dual-filtration system and adjustable pump mechanism. The ability to switch between “filter” and “purifier” modes, each with its own specialized cartridge, allows users to tailor the filtration process to the specific water conditions they encounter, ensuring a high level of water purity and safety regardless of the environment.

    The Vario’s intuitive design and user-friendly controls further contribute to an overall positive user experience, making it an accessible and efficient choice for a wide range of individuals, from experienced outdoor adventurers to those new to water treatment in the field. The filter’s clear flow indicators, comfortable handle, and simple operation allow users to confidently and effectively operate the device, even in challenging environments or under stress.

    While the Vario’s relatively slow maximum flow rate in purifier mode may not be ideal for users who require rapid water replenishment, the filter’s overall functionality, adaptability, and robust construction make it a highly capable and reliable companion for a diverse array of outdoor activities, travel scenarios, and emergency preparedness needs.

    FAQ

    Q. How does the Katadyn Vario Water Filter work?

    The Katadyn Vario Water Filter utilizes a dual-filtration system that includes a ceramic pre-filter and a glass-fiber filter. The ceramic pre-filter removes larger particulates and sediment, while the glass-fiber filter removes bacteria and protozoa. Users can switch between “filter” and “purifier” modes to optimize the filtration process based on water conditions.

    Q. How often should I replace the filter cartridges?

    The frequency of filter cartridge replacement depends on the quality of the water being filtered and the amount of use. The ceramic pre-filter can be cleaned and reused, while the glass-fiber filter should be replaced approximately every 500 gallons (2,000 liters) or when the flow rate noticeably decreases.

    Q. Is the Katadyn Vario Water Filter suitable for international travel?

    Yes, the Katadyn Vario Water Filter is suitable for international travel. Its ability to remove a wide range of contaminants, including bacteria and protozoa, makes it a reliable choice for filtering water from various sources around the world. However, it is important to note that the Vario does not remove viruses, so additional precautions may be necessary in areas with known viral contamination.

    Q. Can the Katadyn Vario filter saltwater?

    No, the Katadyn Vario Water Filter is not designed to filter saltwater. It is intended for use with freshwater sources such as rivers, lakes, and streams. Filtering saltwater can damage the filter and render it ineffective.

    Q. How do I clean and maintain the Katadyn Vario Water Filter?

    To clean and maintain the Katadyn Vario, disassemble the filter and rinse the ceramic pre-filter under clean water to remove any accumulated sediment. The glass-fiber filter can be gently rinsed if necessary, but it should not be scrubbed or cleaned with soap. Regularly inspect the O-rings and replace them if they show signs of wear or damage. Store the filter in a clean, dry place when not in use.

    Loading


  • When it comes to backpacking, having a reliable and versatile knife is essential. Whether you’re hiking, trekking, or backpacking, a good knife can be a valuable tool in various situations. But with so many options available, which one should you choose, a folding knife or a fixed blade knife? In this article, we will explore the differences between these two types of knives and help you make an informed decision on which one is best for your backpacking adventures.

    Understanding the Basics

    Folding Knives

    Folding knives, also known as pocket knives, are designed with a pivot mechanism that allows the blade to fold into the handle. These knives are compact and easy to carry, making them popular among backpackers. They typically have a locking mechanism to keep the blade securely in place when in use.

    In backpacking, folding knives are versatile tools that can be used for various tasks such as cutting ropes, preparing food, or even starting a fire. They are lightweight and take up minimal space, making them ideal for those who prioritize weight and space considerations in their backpacking gear.

    Fixed Blade Knives

    On the other hand, fixed blade knives have a blade that extends from the handle without any folding mechanism. These knives are known for their strength, durability, and reliability. They are commonly used in more demanding backpacking scenarios, such as bushcraft or survival situations.

    Fixed blade knives excel in tasks that require more force, such as batoning wood or performing heavy-duty cutting tasks. They are also easier to clean and maintain compared to folding knives. However, due to their larger size, they may take up more space and add weight to your backpack.

    Factors to Consider When Choosing a Backpacking Knife

    When deciding between a folding knife and a fixed blade knife for backpacking, several factors should be taken into consideration:

    Purpose and Type of Tasks

    Think about the specific tasks you expect to perform with your knife during your backpacking trips. Are you mainly looking for a knife to handle basic cutting tasks like food preparation and rope cutting? Or do you anticipate needing a knife for more demanding tasks like wood processing or self-defense? Understanding your intended use will help you determine which type of knife is best suited for your needs.

    Weight and Space Considerations

    Backpacking often requires careful consideration of weight and space limitations. If you prioritize minimizing weight and saving space, a folding knife may be the better option. These knives are generally lighter and more compact than fixed blade knives. However, if you value the added strength and durability of a fixed blade knife, you may be willing to sacrifice a bit of weight and space.

    Durability and Reliability

    In rugged backpacking environments, durability and reliability are crucial. Fixed blade knives are generally considered to be more durable and reliable due to their solid construction and lack of moving parts. Folding knives, while still durable, may have more potential points of failure due to their folding mechanism. Consider the conditions in which you will be backpacking and choose a knife that can withstand the demands of your adventures.

    Ease of Use and Accessibility

    When it comes to ease of use and accessibility, folding knives have the advantage. They can be easily opened with one hand and are generally more user-friendly. Fixed blade knives, on the other hand, require a sheath for safe storage and may take a bit more time and effort to access. Consider your preference for quick and easy access versus the added security and stability of a fixed blade knife.

    Safety Concerns

    Safety should always be a top priority when choosing a backpacking knife. Folding knives with a reliable locking mechanism can provide added safety by preventing accidental closure during use. Fixed blade knives, while lacking a folding mechanism, require proper sheathing and handling techniques to ensure safe use. Consider your comfort level with each type of knife and choose the one that aligns with your safety preferences.

    Maintenance and Care

    Proper maintenance and care are essential for the longevity of your backpacking knife. Folding knives may require more frequent cleaning and lubrication to ensure smooth operation of the folding mechanism. Fixed blade knives, on the other hand, are generally easier to clean and maintain due to their simpler design. Consider your willingness to invest time and effort into maintaining your knife and choose accordingly.

    Legal Considerations for Carrying Knives

    Before purchasing a backpacking knife, it’s important to familiarize yourself with the legal regulations regarding knife carry in your specific region. Different countries and even states may have varying laws and restrictions on the length and type of knives that can be carried. Ensure that you choose a knife that complies with the legal requirements of your backpacking destinations.

    In-Depth Comparison

    Now that we have explored the basics and factors to consider, let’s dive deeper into the specific pros and cons of folding knives and fixed blade knives for backpacking.

    Folding Knives

    Folding knives offer several advantages for backpackers:

    • Portability: Folding knives are compact and easy to carry, making them convenient for backpacking trips where space is limited.
    • Versatility: These knives can handle a wide range of tasks, from basic cutting to more intricate tasks like food preparation.
    • Safety: Folding knives often come with a locking mechanism that keeps the blade securely in place during use, reducing the risk of accidents.
    • Accessibility: Many folding knives can be opened with one hand, allowing for quick and easy access when needed.

    However, there are also some drawbacks to consider:

    • Durability: The folding mechanism of these knives introduces potential points of failure, and the moving parts may require more frequent maintenance.
    • Strength: Folding knives may not be as strong as fixed blade knives, making them less suitable for heavy-duty tasks.
    • Cleaning: The folding mechanism can make cleaning and maintenance more challenging compared to fixed blade knives.

    When choosing a folding knife for backpacking, consider the following features:

    • Blade Steel: Look for high-quality blade steel that offers good edge retention and corrosion resistance, such as stainless steel or carbon steel.
    • Lock Type: Different folding knives use various locking mechanisms, including liner locks, frame locks, and lockbacks. Choose a lock type that provides secure blade locking during use.

    Fixed Blade Knives

    Fixed blade knives also have their own set of advantages:

    • Strength and Durability: Fixed blade knives are generally stronger and more durable than folding knives, making them suitable for heavy-duty tasks.
    • Easy Maintenance: With no moving parts, fixed blade knives are easier to clean and maintain.
    • Reliability: These knives are less prone to mechanical failure, providing a reliable tool in demanding backpacking situations.
    • Sheath Quality: Fixed blade knives often come with high-quality sheaths that offer secure storage and quick access when needed.

    However, there are a few considerations to keep in mind:

    • Size and Weight: Fixed blade knives are typically larger and heavier than folding knives, which may impact your overall backpacking gear weight and space.
    • Accessibility: You will need a sheath to carry a fixed blade knife safely, which may require additional effort to access the knife when needed.
    • Legal Restrictions: Fixed blade knives may be subject to stricter legal regulations in some regions, so be sure to check the laws before carrying one.

    When choosing a fixed blade knife for backpacking, consider the following features:

    • Full Tang: Look for knives with a full tang construction, where the blade extends through the entire handle. This provides added strength and durability.
    • Blade Shape: Different blade shapes, such as drop point, clip point, or tanto, offer varying advantages for different tasks. Choose a blade shape that suits your specific needs.
    • Sheath Design: Consider the quality and functionality of the sheath, ensuring it provides secure storage and easy access.

    Situational Considerations

    To further guide your decision, consider the specific situations and backpacking styles you may encounter:

    Match the Knife to Your Backpacking Style

    Different backpacking styles may require different knife types. Consider the following:

    • Ultralight Backpacking: If you prioritize minimizing weight, a folding knife may be more suitable for your ultralight gear setup.
    • Bushcraft and Survival: In scenarios where you anticipate heavy-duty tasks like wood processing or building shelters, a fixed blade knife’s strength and durability may be preferable.

    Environmental Factors

    Environmental conditions can also influence your knife choice:

    • Wet Conditions: If you expect to encounter wet environments or need a knife for water-related tasks, consider a knife with corrosion-resistant materials.
    • Cold Weather: In cold weather, folding knives may be more prone to freezing or becoming difficult to operate. Fixed blade knives are generally more reliable in such conditions.

    Duration and Nature of the Trip

    The length and nature of your backpacking trip can impact your knife choice:

    • Short Trips: For shorter trips where weight and space are less critical, you may opt for a fixed blade knife for its added strength and versatility.
    • Long Expeditions: On longer expeditions, where durability and reliability are paramount, a fixed blade knife may be the better choice.

    User Experience and Ergonomics

    Consider the following aspects of user experience and ergonomics when choosing a backpacking knife:

    • Handling and Comfort: Look for a knife with a handle that feels comfortable in your hand and provides a secure grip, even in wet or slippery conditions.
    • One-Handed Operation vs. Two-Handed Operation: Folding knives offer the convenience of one-handed operation, while fixed blade knives typically require two hands for use.
    • Grip and Handle Materials: Consider the materials used for the handle, such as rubber, G10, or wood, and choose one that suits your preferences for grip and comfort.

    Technical Specifications

    Understanding the technical specifications of knives can help you make an informed decision:

    Blade Materials and Edge Retention

    Different blade materials offer varying levels of edge retention and corrosion resistance. Common blade materials include stainless steel, carbon steel

    and high-carbon stainless steel. Stainless steel blades are known for their corrosion resistance, making them ideal for outdoor use. Carbon steel blades, on the other hand, are known for their excellent edge retention and are easier to sharpen. Consider your priorities in terms of edge retention and corrosion resistance when selecting a blade material.

    Blade Length and Shape

    The length and shape of the blade can greatly impact its functionality. Longer blades are better suited for tasks that require more reach, such as batoning wood or cutting larger objects. Shorter blades, on the other hand, offer more control and precision for tasks like food preparation or carving. Blade shapes, such as drop point, clip point, or tanto, offer different advantages for specific tasks. Choose a blade length and shape that align with your intended use.

    Handle Design and Materials

    The design and materials of the handle can greatly affect the comfort and grip of the knife. Look for handles that are ergonomically designed and provide a secure grip, even in wet or slippery conditions. Common handle materials include rubber, G10, wood, and synthetic composites. Consider your preferences for grip and comfort when selecting a handle material.

    Overall Size and Weight

    The overall size and weight of the knife can impact your backpacking experience. A compact and lightweight knife is ideal for those who prioritize minimizing weight and saving space. However, if you value the added strength and durability of a larger knife, you may be willing to carry the extra weight. Consider the size and weight of the knife in relation to your backpacking gear and personal preferences.

    FAQ

    Q: Can I carry a folding knife in my backpack while traveling?

    Yes, you can generally carry a folding knife in your backpack while traveling. However, it’s important to familiarize yourself with the legal regulations regarding knife carry in your specific region. Different countries and even states may have varying laws and restrictions on the length and type of knives that can be carried. Ensure that you comply with the legal requirements of your backpacking destinations.

    Q: Are fixed blade knives more durable than folding knives?

    Yes, fixed blade knives are generally considered to be more durable than folding knives. Fixed blade knives have a solid construction with no moving parts, making them less prone to mechanical failure. However, folding knives can still be durable, but their folding mechanism introduces potential points of failure.

    Q: Which type of knife is better for basic cutting tasks like food preparation?

    Both folding knives and fixed blade knives can handle basic cutting tasks like food preparation. However, folding knives offer the advantage of being more compact and easily accessible. They are often designed with a locking mechanism to keep the blade securely in place during use, providing added safety.

    Q: Can I use a folding knife for heavy-duty tasks like batoning wood?

    While folding knives can handle some heavy-duty tasks, they may not be as suitable as fixed blade knives. Fixed blade knives are generally stronger and more durable, making them better suited for tasks that require more force, such as batoning wood or performing heavy-duty cutting tasks.

    Q: How often should I clean and maintain my backpacking knife?

    The frequency of cleaning and maintenance for your backpacking knife will depend on several factors, including the type of knife and the conditions in which it is used. Folding knives with a folding mechanism may require more frequent cleaning and lubrication to ensure smooth operation.

    Fixed blade knives, on the other hand, are generally easier to clean and maintain due to their simpler design. It’s recommended to clean and lubricate your knife regularly, especially after extended use or exposure to harsh conditions.

    Conclusion

    When it comes to choosing between a folding knife and a fixed blade knife for backpacking, there is no definitive answer. Both types of knives have their own advantages and considerations. It ultimately comes down to your personal preferences, intended use, and the specific requirements of your backpacking adventures.

    Consider factors such as purpose, weight and space considerations, durability, ease of use, safety, maintenance, and legal considerations when making your decision. By understanding the differences and considering your specific needs, you can choose the knife that best suits your backpacking style and enhances your outdoor experiences.

    Loading


  • Embarking on a winter overnight hike can be an exhilarating and rewarding experience, but it requires careful planning and preparation. The cold weather and snowy conditions demand specific gear to ensure your safety, comfort, and enjoyment. This comprehensive guide will take you through the essential gear and packing tips for a winter overnight hike, helping you make the most of your adventure in the winter wilderness.

    TL;DR

    • Planning and preparation are crucial for a winter overnight hike
    • Familiarize yourself with the unique challenges of the winter environment
    • Be prepared for unpredictable weather conditions and limited daylight hours
    • Understand potential hazards such as hidden obstacles and icy patches
    • Research and gather information about trail conditions before hiking
    • Educate yourself about avalanche safety in mountainous regions
    • Choose the right backpack with ample storage capacity and a lightweight yet durable design
    • Consider the suspension system and accessibility of the backpack
    • Recommended backpacks include Osprey Atmos AG 65, Deuter Aircontact Lite 50+10, and Gregory Baltoro 65
    • Dress appropriately with base layers, insulating layers, and outer layers
    • Opt for moisture-wicking materials like merino wool or synthetic fabrics
    • Use fleece jackets, down jackets, or synthetic insulated jackets for warmth
    • Wear waterproof and windproof jackets made with breathable fabrics
    • Select hiking pants made from durable and water-resistant materials
    • Invest in high-quality, moisture-wicking socks for warm and dry feet

    Understanding the Winter Environment

    Before embarking on a winter overnight hike, it is crucial to familiarize yourself with the unique challenges and considerations of the winter environment. This section will provide valuable information on various aspects such as weather conditions, daylight hours, potential hazards, trail conditions, and avalanche safety. Understanding these factors will not only enhance your knowledge but also enable you to make informed decisions when selecting gear and planning your route.

    Weather Conditions

    Winter weather can be unpredictable and harsh, so it is essential to be prepared for a wide range of conditions. Snowfall, freezing temperatures, strong winds, and limited visibility are common characteristics of the winter season. It is crucial to check the weather forecast before your hike and be aware of any potential storms or extreme weather conditions that may arise. Dressing appropriately and carrying the right gear can help you stay comfortable and safe in challenging weather conditions.

    Daylight Hours

    During the winter months, daylight hours are significantly shorter compared to other seasons. It is important to plan your hike accordingly and be mindful of the limited daylight available. Start your hike early in the day to maximize daylight hours and ensure you have enough time to reach your destination before darkness falls. Carrying a headlamp or flashlight is also essential in case you find yourself hiking in low-light conditions.

    Potential Hazards

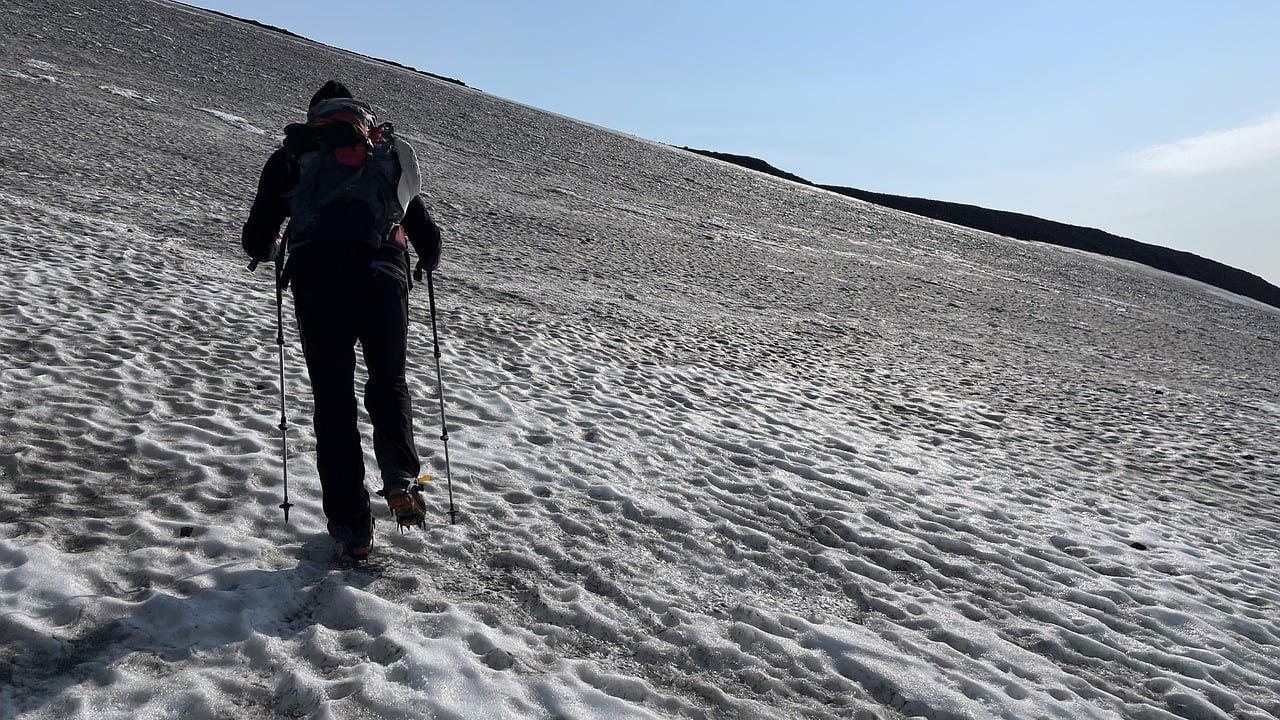
    Winter hiking presents unique hazards that may not be present during other times of the year. Snow-covered trails can hide obstacles such as rocks, tree roots, or uneven terrain, increasing the risk of slips, trips, and falls. Additionally, icy patches and frozen water bodies can pose a significant danger if not approached with caution. It is crucial to wear appropriate footwear with good traction and use trekking poles for added stability. Being aware of potential hazards and taking necessary precautions can help prevent accidents and injuries.

    Trail Conditions

    Winter trail conditions can vary greatly depending on factors such as recent snowfall, temperature fluctuations, and trail maintenance. It is essential to research and gather information about the specific trail you plan to hike. Check with local authorities, park rangers, or experienced hikers for updates on trail conditions. This will help you determine if any sections of the trail are impassable or require additional equipment, such as snowshoes or crampons, to navigate safely.

    Avalanche Safety

    In mountainous regions, the risk of avalanches is a significant concern during the winter season. Avalanches can be triggered by various factors, including snowfall, wind, temperature changes, and slope angle. It is crucial to educate yourself about avalanche safety and understand how to assess the risk of avalanches in the area you plan to hike. Consider taking an avalanche safety course or consulting with local experts to learn about proper route planning, recognizing avalanche terrain, and carrying essential avalanche safety gear, such as a beacon, shovel, and probe.

    By familiarizing yourself with these aspects of the winter environment, you will be better equipped to face the challenges and make informed decisions during your winter overnight hike. Remember, safety should always be your top priority, and being prepared is the key to a successful and enjoyable winter hiking experience.

    Choosing the Right Backpack

    When it comes to embarking on a winter hike, selecting the appropriate backpack is crucial. Not only does it allow you to carry all your gear comfortably, but it also ensures that you can do so efficiently. In this section, we will delve into the factors you should consider when choosing a backpack for your winter adventure. We will explore aspects such as size, weight, suspension system, and accessibility. Additionally, we will provide you with some recommendations for backpacks that are specifically designed for winter hikes.

    Size

    The size of your backpack plays a significant role in determining how much gear you can carry. For winter hikes, it is essential to choose a backpack with ample storage capacity. You will need to pack extra layers of clothing, insulation, food, water, and other essential items to combat the cold weather. Look for a backpack with a capacity of at least 40 liters to accommodate all your winter gear comfortably.

    Weight

    Winter gear tends to be bulkier and heavier than gear used in other seasons. Therefore, it is crucial to consider the weight of the backpack itself. Opt for a backpack that is lightweight yet durable, as you don’t want to add unnecessary weight to your load. Look for materials such as ripstop nylon or polyester, which offer a good balance between weight and durability.

    Suspension System

    The suspension system of a backpack determines how it distributes the weight across your body. A well-designed suspension system can significantly impact your comfort and overall hiking experience. Look for backpacks with adjustable shoulder straps, hip belts, and load lifters. These features allow you to customize the fit and ensure that the weight is evenly distributed, reducing strain on your back and shoulders.

    Accessibility

    When hiking in winter conditions, easy access to your gear is essential. Look for backpacks with multiple compartments, pockets, and external attachment points. These features allow you to organize your gear efficiently and access specific items without having to unpack everything. Additionally, consider backpacks with a front-loading or top-loading design, as they provide convenient access to your gear while on the trail.

    Backpack Recommendations

    Now that we have discussed the factors to consider when choosing a backpack for winter hikes, let’s explore some recommendations:

    Osprey Atmos AG 65 

    This backpack offers a spacious main compartment, excellent suspension system, and multiple pockets for organizing your gear. The Anti-Gravity (AG) suspension system provides exceptional comfort and support, making it an ideal choice for long winter hikes.

    Deuter Aircontact Lite 50+10 

    With its adjustable back length and ergonomic design, this backpack offers a customizable fit and excellent load distribution. The Aircontact Lite system ensures optimal ventilation, preventing excessive sweating during intense winter hikes.

    Gregory Baltoro 65 

    Known for its durability and comfort, the Gregory Baltoro 65 is a popular choice among winter hikers. It features a robust suspension system, ample storage space, and convenient access points, making it suitable for extended winter adventures.

    Remember, choosing the right backpack is a personal decision that depends on your specific needs and preferences. It is always recommended to try on different backpacks and consider factors such as fit, comfort, and durability before making a final decision.

    By selecting the appropriate backpack for your winter hike, you can ensure that you have the necessary storage capacity, weight distribution, and accessibility to make your adventure a success. 

    Clothing and Layering

    When embarking on a winter overnight hike, ensuring that you stay warm and dry is of utmost importance. Proper clothing and layering play a crucial role in achieving this. In this section, we will delve into the various components of winter clothing, including base layers, insulating layers, outer layers, hiking pants, socks, hats, gloves, and facemasks. We will also provide valuable advice on choosing the right materials, layering techniques, and packing strategies to optimize warmth and effectively manage moisture.

    Base Layers

    Base layers are the foundation of your winter clothing system. They are designed to wick moisture away from your body, keeping you dry and comfortable. When choosing base layers, opt for materials such as merino wool or synthetic fabrics like polyester or nylon. These materials have excellent moisture-wicking properties and provide insulation even when wet. Avoid cotton, as it retains moisture and can leave you feeling cold and damp.

    Insulating Layers

    Insulating layers are responsible for trapping heat and keeping you warm. Fleece jackets, down jackets, and synthetic insulated jackets are popular choices for winter hikes. Fleece jackets are lightweight, breathable, and provide excellent insulation. Down jackets offer exceptional warmth-to-weight ratio but are less effective when wet. Synthetic insulated jackets are a great alternative as they retain warmth even when damp and dry quickly.

    Outer Layers

    Outer layers, such as waterproof and windproof jackets, are essential for protecting you from the elements. Look for jackets made with waterproof and breathable fabrics, such as Gore-Tex or eVent. These materials prevent rain and snow from penetrating while allowing moisture to escape, keeping you dry and comfortable. Additionally, ensure that your jacket has a hood to shield your head from rain, snow, and wind.

    Hiking Pants

    Choosing the right hiking pants is crucial for winter hikes. Look for pants made from durable and water-resistant materials like nylon or softshell fabrics. These materials provide protection against moisture and wind while allowing for breathability. Consider pants with reinforced knees and seat for added durability, and opt for a relaxed fit to allow for easy movement and layering underneath.

    Socks

    Keeping your feet warm and dry is essential during winter hikes. Invest in high-quality, moisture-wicking socks made from merino wool or synthetic materials. These socks provide insulation, wick away moisture, and prevent blisters. Consider wearing a thin liner sock underneath for added warmth and to reduce friction.

    Hats, Gloves, and Facemasks

    Protecting your extremities is crucial in cold weather conditions. Choose a hat that covers your ears and is made from a warm and insulating material like fleece or wool. For gloves, opt for waterproof and insulated options to keep your hands dry and warm. Consider wearing a lightweight liner glove underneath for added warmth and dexterity. In extremely cold conditions, a facemask or balaclava can provide additional protection for your face against wind and frostbite.

    Layering Techniques

    Layering is a key strategy for regulating body temperature and managing moisture during winter hikes. The layering system typically consists of three layers: base layer, insulating layer, and outer layer. Start with a moisture-wicking base layer to keep your skin dry. Add insulating layers for warmth, and finish with an outer layer to protect against wind and precipitation. Adjust the number and thickness of layers based on the weather conditions and your activity level.

    Packing Strategies

    When packing for a winter hike, consider the following strategies to optimize warmth and moisture management:

    • Roll your clothing instead of folding to save space and reduce wrinkles.
    • Pack your base layers and socks in waterproof bags to keep them dry.
    • Place heavier items at the bottom of your backpack for better weight distribution.
    • Keep frequently used items, such as hats and gloves, easily accessible in the outer pockets of your backpack.
    • Consider using compression sacks to reduce the bulk of your insulating layers.

    By following these clothing and layering guidelines, you can ensure that you stay warm, dry, and comfortable throughout your winter hike. Remember to choose the right materials, employ effective layering techniques, and pack strategically to optimize your overall experience.

    Footwear and Accessories for Winter Hiking

    When it comes to winter hiking, having the right footwear and accessories is crucial. The cold weather and challenging terrain demand specialized gear that provides traction, insulation, and protection from the elements. In this section, we will delve into the importance of insulated and waterproof boots, gaiters, traction devices like crampons or microspikes, as well as other essential accessories such as trekking poles, sunglasses, and hand warmers.

    Insulated and Waterproof Boots

    One of the most critical aspects of winter hiking is keeping your feet warm and dry. Insulated and waterproof boots are designed to do just that. These boots are typically made with materials that provide excellent insulation, such as Thinsulate or Gore-Tex. They also feature a waterproof membrane that prevents water from seeping in, keeping your feet dry even in wet and snowy conditions.

    When choosing insulated and waterproof boots, it’s essential to consider the temperature rating. Look for boots that are rated for the coldest temperatures you expect to encounter during your winter hikes. Additionally, ensure that the boots have a sturdy outsole with deep lugs for optimal traction on icy and slippery surfaces.

    Gaiters

    Gaiters are an often overlooked but essential accessory for winter hiking. These protective coverings are worn over your boots and lower legs to provide an extra layer of defense against snow, water, and debris. Gaiters are especially useful when hiking in deep snow or wet conditions, as they prevent moisture from entering your boots and keep your lower legs dry.

    There are different types of gaiters available, including ankle gaiters and full-length gaiters. Ankle gaiters are shorter and are ideal for light snow or trail hiking, while full-length gaiters offer more comprehensive protection and are suitable for deep snow or off-trail adventures. Whichever type you choose, make sure they are made from waterproof and breathable materials for maximum comfort and functionality.

    Traction Devices: Crampons and Microspikes

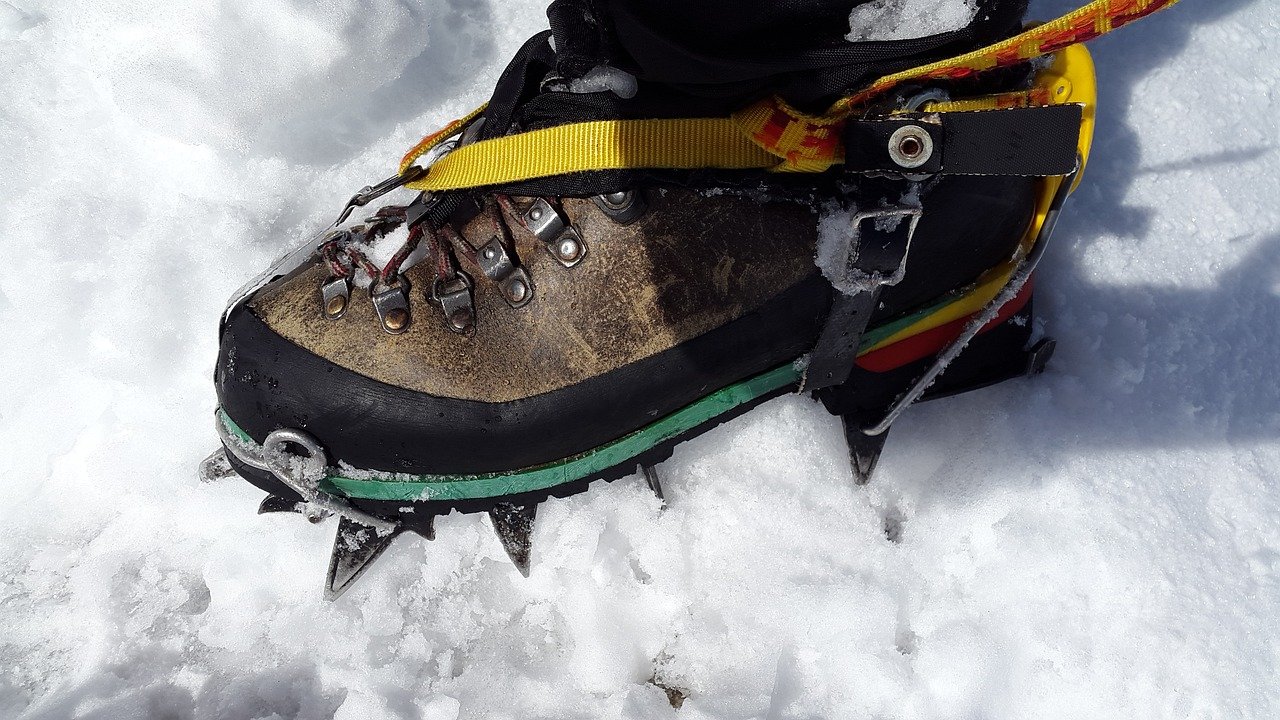
    Winter hiking often involves traversing icy and slippery terrain, which can be treacherous without proper traction. That’s where traction devices like crampons and microspikes come in handy. These accessories attach to the soles of your boots and provide additional grip on icy surfaces, reducing the risk of slips and falls.

    Crampons are designed for more extreme conditions and feature sharp spikes that dig into ice and hard-packed snow. They are commonly used for mountaineering and ice climbing. On the other hand, microspikes are lighter and more versatile, making them suitable for winter hiking and trail running. They have smaller spikes that provide excellent traction on icy trails without the need for specialized footwear.

    When choosing traction devices, consider the type of terrain you will encounter and the level of traction required. It’s also important to ensure that the devices are compatible with your boots and can be easily attached and removed.

    Shelter and Sleeping Gear for Winter Hiking

    When embarking on an overnight winter trek, ensuring you have the right shelter and sleeping gear is essential for a comfortable and safe experience. In this section, we will discuss the considerations for selecting a winter tent, sleeping bag, sleeping pad, and pillow. We will also provide valuable tips on site selection, setting up camp in winter conditions, and maximizing warmth inside the tent.

    Selecting a Winter Tent

    Choosing the right tent for winter hiking is crucial, as it will be your primary shelter against the harsh elements. Look for a tent specifically designed for winter use, as these tents are constructed with sturdier materials and have features that provide enhanced insulation and wind resistance.

    When selecting a winter tent, consider the following factors:

    • Seasonality: Ensure that the tent is rated for four-season use. This means it can withstand the rigors of winter conditions, including heavy snowfall and strong winds.
    • Capacity: Opt for a tent that can accommodate one or two more people than you intend to sleep. This extra space allows for storing gear and provides room to move around comfortably.
    • Weight: Keep in mind that winter tents tend to be heavier due to their robust construction. Consider the weight of the tent and ensure it is manageable for your hiking abilities.
    • Ventilation: Look for a tent with adequate ventilation options, such as mesh panels and adjustable vents. Proper ventilation helps reduce condensation inside the tent, keeping you dry and comfortable.
    • Durability: Winter conditions can be harsh, so choose a tent made from durable materials that can withstand snow, wind, and abrasion. Reinforced stitching and sturdy poles are essential features to look for.
    • Ease of setup: Consider how easy it is to set up the tent, especially in cold and challenging conditions. Look for tents with intuitive designs and color-coded components for hassle-free setup.

    Selecting a Sleeping Bag

    A high-quality sleeping bag is essential for staying warm and comfortable during winter hikes. Look for a sleeping bag specifically designed for cold temperatures, with a temperature rating that matches the lowest temperatures you expect to encounter. It’s important to note that the temperature rating indicates the lowest temperature at which the bag will keep you alive, not necessarily comfortable.

    Consider the following factors when selecting a winter sleeping bag:

    • Temperature rating: Choose a sleeping bag with a temperature rating that matches the coldest temperatures you anticipate. Keep in mind that it’s better to have a bag rated for lower temperatures than you expect to encounter to ensure warmth.
    • Insulation: Sleeping bags are typically insulated with down or synthetic materials. Down insulation offers excellent warmth-to-weight ratio but loses its insulating properties when wet. Synthetic insulation, on the other hand, retains warmth even when damp. Consider the conditions you’ll be hiking in and choose the appropriate insulation type.
    • Shape: Sleeping bags come in various shapes, including mummy, semi-rectangular, and rectangular. Mummy-shaped bags offer the best warmth-to-weight ratio but can feel restrictive. Rectangular bags provide more room to move but may not be as efficient in retaining heat. Choose a shape that balances warmth and comfort for your preferences.
    • Length and width: Ensure that the sleeping bag is long enough to accommodate your height comfortably. Some bags also come in different widths to provide a snug fit or extra room. Consider your body size and sleeping habits when selecting the appropriate size.
    • Features: Look for additional features that enhance warmth and comfort, such as draft collars, hood cinches, and zipper draft tubes. These features help seal in heat and prevent cold drafts from entering the bag.

    Selecting a Sleeping Pad

    A sleeping pad is essential for insulation and cushioning, providing a barrier between you and the cold ground. It helps prevent heat loss through conduction and offers comfort for a restful sleep. When selecting a sleeping pad for winter hiking, consider the following factors:

    • Insulation: Look for a sleeping pad with insulation to provide additional warmth. Some pads are insulated with foam or synthetic materials, while others use air chambers filled with insulating gas. Choose a pad with an appropriate R-value (a measure of insulation) for the temperatures you expect to encounter.
    • Thickness and comfort: Consider the thickness and comfort of the sleeping pad. Thicker pads offer more cushioning but may be bulkier and heavier. Look for pads with ergonomic designs that provide support for your body and minimize pressure points.
    • Inflation and deflation: Choose a sleeping pad that is easy to inflate and deflate, especially in cold conditions when dexterity may be reduced. Some pads come with built-in pumps or valves that allow for quick inflation and deflation.
    • Size and weight: Consider the size and weight of the sleeping pad, as it will add tothe overall weight of your backpack. Look for a pad that strikes a balance between comfort and portability, considering the space available in your backpack.
    • Durability: Winter hiking can be demanding on gear, so choose a sleeping pad made from durable materials that can withstand rough terrain and potential punctures. Look for pads with reinforced fabrics or added protection against abrasion.

    Selecting a Pillow

    While a pillow may seem like a luxury item, having proper neck support and comfort can greatly improve your sleep quality during a winter hike. When selecting a pillow, consider the following factors:

    • Size and weight: Look for a pillow that is compact and lightweight, making it easy to pack and carry. Inflatable pillows are a popular choice as they can be deflated and rolled up when not in use.
    • Comfort: Choose a pillow that provides adequate support for your neck and head. Look for pillows with adjustable firmness or contoured designs that mimic the shape of your neck.
    • Material: Consider the material of the pillow cover for comfort and durability. Some pillows have soft fabric covers, while others have moisture-wicking properties to keep you dry.
    • Inflation and deflation: Opt for a pillow that is easy to inflate and deflate. Look for pillows with quick-release valves or built-in pumps for convenient adjustments.

    Maximizing Warmth Inside the Tent

    Keeping warm inside the tent is crucial for a comfortable night’s sleep during a winter hike. Here are some tips to maximize warmth:

    • Layer up: Wear thermal base layers and insulating clothing to retain body heat. Layering allows you to adjust your clothing according to your comfort level.
    • Use a tent footprint: Placing a tent footprint or groundsheet underneath your sleeping area provides an extra layer of insulation and protection against the cold ground.
    • Insulate the tent floor: Use foam or inflatable sleeping pads to insulate the tent floor. This helps prevent heat loss through conduction and provides additional cushioning.
    • Ventilation management: While it may seem counterintuitive, proper ventilation is essential to reduce condensation inside the tent. Open vents or adjust them to allow for airflow without compromising warmth.
    • Hot water bottle: Fill a hot water bottle with warm water and place it in your sleeping bag before bed. This provides additional warmth throughout the night.

    Setting up camp in winter conditions requires careful planning and attention to detail. Here are some tips to ensure a successful camp setup:

    • Site selection: Choose a campsite that offers natural protection from wind and potential hazards, such as falling trees or avalanches. Look for areas with natural windbreaks, such as dense trees or rock formations.
    • Clear the snow: Before setting up your tent, clear the snow from the ground to create a level surface. This helps prevent discomfort and ensures a stable tent setup.
    • Tent orientation: Position your tent in a way that maximizes sun exposure and minimizes wind exposure. Orient the door away from prevailing winds to reduce drafts inside the tent.
    • Stake securely: Use sturdy tent stakes to secure your tent to the ground. In winter conditions, stakes with larger surface areas, such as snow stakes or deadman anchors, provide better stability.
    • Guy lines: Attach guy lines to your tent and secure them to nearby trees or rocks. This helps distribute the tension and provides additional stability in windy conditions.

    Essential Gear for Winter Wilderness Cooking

    When venturing into the winter wilderness, it is crucial to have the right kitchen equipment that is both lightweight and efficient. In this section, we will explore various stove options, cookware choices, food selection, and strategies for melting snow to obtain safe drinking water. Additionally, we will emphasize the significance of maintaining proper nutrition and hydration during winter hikes.

    Stove Options

    Choosing the right stove for winter camping is essential for efficient cooking and staying warm. Here are some stove options to consider:

    Liquid Fuel Stoves

    Liquid fuel stoves, such as white gas stoves, are popular among winter campers due to their reliability in cold temperatures. They provide consistent heat output and can melt snow quickly. However, they require regular maintenance and can be heavier compared to other stove types.

    Canister Stoves

    Canister stoves are lightweight and easy to use, making them a preferred choice for backpackers. They use pre-pressurized canisters of fuel, which can be convenient for shorter trips. However, they may struggle to perform in extreme cold conditions, and the fuel canisters may lose pressure in freezing temperatures.

    Multi-Fuel Stoves

    Multi-fuel stoves offer versatility by allowing the use of various fuel types, including liquid fuel and canister fuel. They are reliable in cold weather and provide consistent heat output. However, they tend to be heavier and more expensive than other stove options.

    Cookware

    Selecting the right cookware is crucial for efficient cooking and minimizing weight. Here are some considerations when choosing cookware for winter camping:

    Lightweight Materials

    Opt for cookware made from lightweight materials such as titanium or aluminum. These materials are durable, conduct heat efficiently, and are lightweight, making them ideal for backpacking.

    Non-Stick Coating

    Cookware with a non-stick coating is beneficial for easy cooking and cleaning. It prevents food from sticking to the surface, reducing the need for excessive oil or butter.

    Heat Distribution

    Ensure that your cookware has good heat distribution to prevent hotspots and ensure even cooking. Look for pots and pans with thick, well-insulated bottoms.

    Food Choices

    When planning meals for winter camping, it is essential to choose foods that provide sufficient energy and warmth. Here are some food choices to consider:

    High-Calorie Foods

    Opt for high-calorie foods that provide sustained energy. Nuts, dried fruits, energy bars, and dehydrated meals are excellent options. These foods are lightweight and easy to prepare, making them ideal for winter camping.

    Complex Carbohydrates

    Include complex carbohydrates in your meals to provide long-lasting energy. Foods like whole grains, oats, and quinoa are excellent sources of complex carbs.

    Protein Sources

    Ensure you have enough protein in your diet to aid in muscle recovery and keep you feeling full. Pack foods like canned tuna, jerky, and protein bars.

    Melting Snow for Drinking Water

    In winter camping, melting snow is a primary method of obtaining drinking water. However, it is essential to follow proper techniques to ensure safe consumption. Here are some strategies for melting snow:

    1. Collecting Clean Snow

    Collect snow from areas away from pollution sources, such as animal tracks or human activity. Avoid collecting snow from areas near campfires or heavily trafficked areas.

    2. Filtering and Purifying

    Melted snow should be filtered and purified before consumption to remove any impurities or contaminants. Use a water filter or purification tablets to ensure safe drinking water.

    3. Insulating the Melting Process

    To speed up the melting process, insulate your cooking pot by placing it inside a larger pot with insulating material, such as clothing or foam. This helps retain heat and melt the snow more efficiently.

    Nutrition and Hydration

    Proper nutrition and hydration are vital for staying healthy and energized during winter hikes. Here are some tips to ensure you maintain optimal nutrition and hydration:

    Stay Hydrated

    Drink plenty of water throughout the day, even if you don’t feel thirsty. Dehydration can occur even in cold weather, and staying hydrated helps regulate body temperature and prevent fatigue.

    Eat Balanced Meals

    Consume a balanced diet that includes a mix of carbohydrates, proteins, and healthy fats. This provides the necessary nutrients for energy and muscle recovery.

    Snack Regularly

    Keep energy-rich snacks readily available and consume them regularly to maintain a steady supply of fuel. Nuts, trail mix, and energy bars are convenient options.

    Pack Nutrient-Dense Foods

    Choose foods that are nutrient-dense, meaning they provide a high amount of vitamins and minerals per serving. Fresh fruits, vegetables.

    Hydration and Water Treatment

    Staying hydrated in winter is crucial, just like in any other season. In this section, we will delve into the importance of proper water storage, insulation, and treatment options.

    We will provide valuable guidance on selecting the right water bottles or hydration bladders that are suitable for freezing temperatures. Additionally, we will discuss the various water treatment methods available to ensure the water you consume is safe and clean.

    Importance of Hydration in Winter

    Many people underestimate the importance of staying hydrated during the winter months. The cold weather can be deceiving, as we tend to feel less thirsty compared to hot summer days. However, our bodies still require an adequate amount of water to function optimally.

    Proper hydration in winter offers numerous benefits. It helps regulate body temperature, supports the immune system, prevents dry skin, and aids in digestion. Additionally, staying hydrated can improve cognitive function and overall mood. Therefore, it is essential to prioritize hydration even when the temperatures drop.

    Water Storage and Insulation

    When venturing out in freezing temperatures, it is crucial to choose the right water storage containers that can withstand the cold. Regular plastic water bottles may crack or even burst when exposed to freezing temperatures. To avoid this, consider using insulated water bottles or hydration bladders specifically designed for winter use.

    Insulated water bottles are typically made of stainless steel or double-walled plastic. These materials provide excellent insulation, keeping your water from freezing for extended periods. They are also durable and can withstand harsh outdoor conditions. Look for bottles with wide mouths for easy filling and cleaning, as well as leak-proof lids to prevent any spills.

    Hydration bladders, on the other hand, are flexible reservoirs that can be carried inside a backpack. They are equipped with a drinking tube, allowing you to sip water without having to stop and open a bottle. When choosing a hydration bladder for winter use, ensure it has an insulated sleeve or cover to prevent freezing. Some bladders even come with a heating element to keep the water from turning into ice.

    Water Treatment Methods

    In addition to proper storage and insulation, it is essential to consider water treatment methods to ensure the water you consume is safe and free from contaminants. Here are some common water treatment options:

    • Boiling: Boiling water is the most straightforward and effective method to kill bacteria, viruses, and parasites. Simply bring the water to a rolling boil for at least one minute (or three minutes at higher altitudes) to make it safe for consumption. Boiling is particularly useful when camping or in emergency situations where clean water sources may be limited.
    • Water Filters: Water filters are portable devices that remove impurities from water by physically straining out contaminants. They come in various forms, such as pump filters, gravity filters, and straw filters. When choosing a water filter, consider its filtration capacity, ease of use, and the types of contaminants it can remove. Some filters are specifically designed to remove bacteria and protozoa, while others can also eliminate viruses.
    • Water Purification Tablets: Water purification tablets are small, lightweight tablets that can be dissolved in water to kill harmful microorganisms. They typically contain chemicals such as chlorine dioxide or iodine, which effectively disinfect the water. However, it’s important to follow the instructions provided with the tablets, as they may require a specific contact time to ensure proper purification.
    • UV Water Purifiers: UV water purifiers use ultraviolet light to destroy the DNA of microorganisms, rendering them harmless. These devices are compact and easy to use. Simply place the UV purifier in a container of water, activate it, and stir the water for the recommended time. UV purifiers are effective against bacteria, viruses, and protozoa, but they do not remove sediment or chemicals from the water.
    • Chemical Water Treatment: Chemical water treatment involves using chemicals such as chlorine or iodine to disinfect water. This method is commonly used in emergency situations or when camping. It is important to follow the instructions provided with the chemicals and allow sufficient contact time for effective disinfection. Chemical treatment may alter the taste and odor of the water, so it is advisable to use it as a last resort.

    Navigation and Safety Gear

    Navigating in winter conditions can present unique challenges, and prioritizing safety is of utmost importance. In this section, we will delve into the significance of carrying essential navigation tools such as a map, a compass, and GPS device. We will also discuss the importance of additional safety gear, including a headlamp, whistle, multi-tool, first aid kit, and emergency shelter. Furthermore, we will touch upon the importance of communication devices such as personal locator beacons (PLBs) or satellite messengers.

    Importance of Navigation Tools in Winter

    When venturing into winter landscapes, it is crucial to have the right tools to navigate safely. The combination of snow-covered trails, limited visibility, and changing weather conditions can make it easy to get disoriented. Carrying essential navigation tools can help you stay on track and find your way back to safety.

    • Map: Carrying a detailed map of the area you are exploring is essential. A map provides valuable information about the terrain, trails, landmarks, and potential hazards. It allows you to plan your route in advance and make informed decisions while on the trail. Ensure that the map is up-to-date and waterproof to withstand winter conditions.
    • Compass: A compass is a vital tool for orienting yourself and determining your direction of travel. It works in conjunction with a map, allowing you to navigate accurately even when visibility is limited. Learning how to use a compass properly is essential for effective navigation. Practice using a compass before heading out into the winter wilderness.
    • GPS Device: While traditional navigation tools like maps and compasses are essential, a GPS device can provide an additional layer of accuracy and convenience. GPS devices use satellite signals to pinpoint your location, track your route, and provide real-time data such as elevation and distance traveled. They can be especially useful in areas with complex trail systems or when venturing off-trail. Remember to carry extra batteries or a power bank to ensure your GPS device remains functional throughout your journey.

    Additional Safety Gear

    In addition to navigation tools, it is crucial to carry the right safety gear to ensure your well-being during winter adventures. Here are some essential items to consider:

    • Headlamp: Winter days are shorter, and darkness can descend quickly. Carrying a headlamp with extra batteries is essential for maintaining visibility during low-light conditions. It allows you to navigate safely, set up camp, or attend to emergencies when natural light is limited.
    • Whistle: A whistle is a simple yet effective tool for attracting attention in case of an emergency. It can be heard over long distances and can help rescuers locate you more quickly. Attach a whistle to your backpack or clothing, ensuring it is easily accessible when needed.
    • Multi-tool: A multi-tool is a versatile tool that combines various functions in one compact device. It typically includes features such as a knife, pliers, screwdrivers, and other useful tools. A multi-tool can come in handy for various tasks, from repairing gear to improvising solutions in unexpected situations.
    • First Aid Kit: Carrying a well-stocked first aid kit is essential for addressing minor injuries and providing initial care in case of emergencies. Make sure your kit includes bandages, antiseptic wipes, pain relievers, adhesive tape, and any necessary medications. Familiarize yourself with basic first aid procedures to effectively respond to injuries.
    • Emergency Shelter: In winter conditions, unexpected weather changes or injuries can leave you stranded. Carrying an emergency shelter, such as a lightweight tent or a bivy sack, provides protection from the elements and helps retain body heat. Choose a shelter that is easy to set up and pack, ensuring it fits into your backpack without adding excessive weight.

    Communication Devices

    When venturing into remote winter landscapes, having a reliable means of communication is crucial for safety. Here are two important communication devices to consider:

    • Personal Locator Beacons (PLBs): PLBs are compact, handheld devices that use satellite technology to transmit distress signals in emergency situations. When activated, they send a distress signal to search and rescue authorities, providing them with your location. PLBs are highly recommended for backcountry adventures where cell phone coverage is limited or nonexistent.
    • Satellite Messengers: Satellite messengers are handheld devices that allow you to send and receive text messages, share your location, and request assistance in non-life-threatening situations. They utilize satellite networks to ensure communication even in remote areas. Satellite messengers are useful for keeping loved ones informed about your progress and can be a valuable tool for summoning help if needed.

    Carrying essential navigation tools such as maps, compasses, and GPS devices is crucial for staying on track and finding your way. Additionally, having the right safety gear, includingheadlamps, whistles, multi-tools, first aid kits, and emergency shelters, is essential for addressing potential emergencies and ensuring your well-being.

    Communication devices like personal locator beacons (PLBs) and satellite messengers provide a means of reaching out for help when needed. By being equipped with the right navigation tools, safety gear, and communication devices, you can confidently explore winter landscapes while prioritizing your safety.

    Personal Care and Health

    Ensuring personal hygiene and prioritizing your health are essential aspects of a winter hike. In this section, we will explore various topics related to personal care and health, including the importance of toiletries, sun protection, insect repellent, personal medications, and considerations for winter-specific health issues such as frostbite and hypothermia.

    Importance of Personal Care in Winter

    Maintaining personal hygiene during a winter hike is crucial for both comfort and health. Here are some key aspects to consider:

    • Toiletries: Pack essential toiletries such as toothbrush, toothpaste, soap, and toilet paper. Maintaining oral hygiene is particularly important, as cold weather can increase the risk of dental issues. Brushing your teeth regularly helps prevent tooth decay and gum problems. Additionally, using soap for regular handwashing helps minimize the spread of germs and prevents illnesses.
    • Sun Protection: Although it may not be immediately apparent, sun protection is still important during winter hikes. Snow can reflect sunlight, intensifying its effects on your skin. Apply sunscreen with a high SPF to exposed areas of your skin, including your face, ears, and hands. Don’t forget to wear sunglasses to protect your eyes from harmful UV rays.
    • Personal Medications: If you have any pre-existing medical conditions or require regular medications, ensure that you have an ample supply for the duration of your hike. It is also advisable to carry a copy of your prescriptions and any necessary medical documentation. Pack your medications in a waterproof container to protect them from moisture.

    Winter-Specific Health Issues

    Winter hikes present unique health challenges, and being aware of potential issues can help you prevent and address them effectively. Here are two common winter-specific health issues to consider:

    • Frostbite: Frostbite occurs when skin and underlying tissues freeze due to prolonged exposure to cold temperatures. It commonly affects extremities such as fingers, toes, ears, and nose. To prevent frostbite, dress in layers and ensure that your extremities are adequately covered. Use insulated and waterproof gloves, socks, and boots to protect your hands and feet. If you notice signs of frostbite, such as numbness, tingling, or a white or grayish appearance of the skin, seek shelter immediately and gradually warm the affected area.
    • Hypothermia: Hypothermia is a potentially life-threatening condition that occurs when your body loses heat faster than it can produce it. Symptoms of hypothermia include shivering, confusion, drowsiness, and loss of coordination. To prevent hypothermia, dress in layers and avoid prolonged exposure to cold temperatures. Stay dry and seek shelter if necessary. If someone exhibits signs of hypothermia, take immediate action by providing warm, dry clothing, shelter, and warm fluids. Seek medical assistance as soon as possible.

    Be aware of winter-specific health issues such as frostbite and hypothermia, and take necessary precautions to prevent and address them. By prioritizing personal care and health, you can enjoy a safe and rewarding winter hiking experience.

    Packing Tips and Tricks

    When preparing for a hike, efficient packing and organization are key. In this section, we will provide you with practical tips and tricks to optimize your packing process. From prioritizing essentials to minimizing weight and utilizing compression bags, these strategies will help you pack smart and ensure a comfortable hiking experience.

    1. Prioritize Essentials

    When packing for a hike, it’s important to prioritize the essentials. Here are some key items to consider:

    1. Clothing: Pack appropriate clothing for the weather conditions you will encounter during your hike. Layering is essential for staying comfortable and regulating body temperature. Include moisture-wicking base layers, insulating mid-layers, and waterproof outer layers. Don’t forget extra socks and underwear.
    2. Food and Water: Plan your meals and pack lightweight, nutrient-dense food that is easy to prepare on the trail. Consider options like dehydrated meals, energy bars, nuts, and dried fruits. Carry an adequate supply of water or a water filtration system to ensure hydration throughout your hike.
    3. Shelter: Depending on the duration and location of your hike, you may need to pack a tent, sleeping bag, and sleeping pad. Choose lightweight options that provide sufficient protection from the elements.
    4. Navigation and Safety: Carry a map, compass, or GPS device to navigate your route. Additionally, pack a first aid kit, headlamp, whistle, and a multi-tool for emergency situations.

    2. Minimize Weight

    Reducing the weight of your backpack is crucial for a comfortable hiking experience. Here are some strategies to minimize weight:

    1. Evaluate Necessities: Before packing, carefully consider each item and ask yourself if it is truly necessary. Avoid packing items “just in case.” Stick to the essentials and leave behind any non-essential items.
    2. Choose Lightweight Gear: Invest in lightweight gear such as a lightweight tent, sleeping bag, and cooking equipment. Look for gear made from lightweight materials like titanium or carbon fiber.
    3. Opt for Multipurpose Items: Choose gear and clothing items that serve multiple purposes. For example, a bandana can be used as a towel, a hat, or a makeshift sling.
    4. Pack in Small Quantities: Instead of carrying large quantities of items like toiletries or sunscreen, transfer them into smaller containers or resealable bags. This reduces weight and saves space.

    3. Utilize Compression Bags

    Compression bags are a great tool for maximizing space and organizing your gear. Here’s how to make the most of them:

    1. Roll, Don’t Fold: Instead of folding your clothes, roll them tightly. This not only saves space but also minimizes wrinkles.
    2. Use Compression Sacks: Place your rolled clothing, sleeping bag, and other compressible items into compression sacks. Squeeze out excess air to reduce their volume further.
    3. Separate and Label: Use different compression bags for different categories of items, such as clothing, food, and gear. Label each bag to easily locate items when needed.
    4. Utilize Empty Spaces: Fill empty spaces in your backpack, such as the gaps between larger items, with smaller items or clothing. This helps distribute weight evenly and prevents shifting.

    4. Distribute Weight Properly

    Proper weight distribution in your backpack is essential for maintaining balance and stability while hiking. Follow these tips to distribute weight effectively:

    • Heavier Items at the Bottom: Place heavier items, such as your tent or cooking equipment, at the bottom of your backpack. This lowers your center of gravity and provides better stability.
    • Balance Side to Side: Distribute weight evenly from side to side to prevent your backpack from pulling to one side. This can be achieved by packing similar weight items on each side.
    • Keep Essentials Accessible: Pack frequently used items, such as snacks, water, and rain gear, in easily accessible pockets or the top compartment of your backpack.
    • Secure Loose Items: Use straps or compression straps to secure any loose items to prevent them from shifting and throwing off your balance.

    By prioritizing essentials, minimizing weight, utilizing compression bags, and distributing weight properly, you can optimize your packing process and ensure a comfortable and enjoyable hiking experience. Remember to pack smart, stay organized, and enjoy the beauty of the outdoors.

    Conclusion

    In conclusion, packing for an over-nighter during winter requires thoughtful planning and careful consideration of the unique challenges posed by cold weather and snow-covered landscapes.

    By following the guidelines outlined in this article, you can ensure you have the necessary gear to stay warm, dry, and safe during your winter adventure. Remember to always check weather forecasts, trail conditions, and adhere to safety guidelines provided by park authorities or experienced winter hikers.

    With proper preparation and the right gear, a overnight winter trek can be an unforgettable experience that allows you to witness the beauty of nature in its icy splendor while enjoying the solitude and serenity of the winter wilderness.

    FAQ

    Q: What are the essential gear items for a winter overnight hike?

    A: The essential gear items for a winter overnight hike include a suitable backpack, proper clothing and layering, specialized footwear, shelter and sleeping gear, essential kitchen equipment, hydration and water treatment supplies, navigation and safety gear, and personal care items. Make sure to refer to the corresponding sections in this article for detailed information on each category.

    Q: How do I choose the right backpack for a winter hike?

    Q: What should I wear for a winter overnight hike?

    A: Proper clothing and layering are crucial for staying warm and dry during a winter overnight hike. Base layers, insulating layers, outer layers, hiking pants, socks, hats, gloves, and facemasks are all important components. Section 3 provides detailed information on choosing the right clothing materials, layering techniques, and packing strategies.

    Q: What kind of footwear is recommended for winter hiking?

    A: Winter hiking requires specialized footwear that provides traction, insulation, and protection from the elements. Insulated and waterproof boots are essential, and gaiters can help keep snow out of your boots. Traction devices like crampons or microspikes can provide additional grip on icy terrain. Section 4 covers footwear and accessories in more detail.

    Q: How can I stay hydrated during a winter hike?

    A: Staying hydrated is important during a winter hike. Section 7 provides guidance on water storage, insulation, and treatment options. Choose water bottles or hydration bladders suitable for freezing temperatures. It’s also important to consider the various water treatment methods available to ensure safe drinking water.

    Loading


  • A determined hiker conquering a snow-covered peak in a customized cold weather outfit.

    How Can You Personalize Your Cold Weather Hiking Outfit for Optimal Comfort?

    Brace for winter trails with essential cold weather hiking boots features and care tips.

    • For cold-weather hiking, prioritize clothes that offer warmth, dryness, and suitable fit, whether unisex or gender-specific.
    • Layering is essential: use moisture-wicking base layers, add insulating fleece, and top with a windproof, waterproof jacket. Adapt summer gear with thermal liners and heavier coats for freezing temps.
    • Protect your skin with strong sunscreen and UV-blocking sunglasses; higher altitudes increase UV risks, so cover up and use sunscreen generously.
    • Select hiking pants made for cold weather, prioritizing materials and designs that offer insulation without restricting movement.
    • Choose winter-specific hats that cover ears and are wind-resistant, and use waterproof gloves with thermal liners for hand warmth.
    • Always hike with an emergency communication device, like a phone or satellite messenger, for safety.

    Bracing the chill on a trek doesn’t mean sacrificing comfort. In “How Can You Personalize Your Cold Weather Hiking Outfit for Optimal Comfort?”, we’ll guide you through choosing gear that fits and warms, specifically yours. From must-have boots that keep your toes toasty to pants that let you move freely, we’ve got insights to tackle the cold head-on. Get ready to layer up and step out with confidence, no matter how icy the trail gets!

    How Can You Personalize Your Cold Weather Hiking Outfit for Optimal Comfort?

    When it’s cold and you plan to hike, your clothes must keep you warm and dry. For women who hike in winter, find the best hiking pants that match your body shape. Pants should let you move and not be too tight. They need to protect you from the cold and wet but also let sweat out so you stay dry.

    Next, think about whether you want clothes made for all or clothes made just for women or men. Unisex gear often fits differently but can work well. Yet, some women find that women’s specific winter hiking apparel fits better. They say it helps them move freely and stay warm.

    Your head loses a lot of heat, so get good hiking headwear. Look for hats that cover your ears and stay on in the wind. A hat that blocks the wind can make a big difference in how warm you feel.

    Your hands need special care too. Try waterproof gloves for trekkers when you hike in snow or rain. Some hikers wear thermal liner gloves under other gloves for extra warmth. This trick lets you take off the top glove if you get too hot.

    Remember, your comfort depends on your clothes. Every person feels the cold differently. Test in cold weather to see what works for you. Take care of your clothes, so they keep you warm hike after the hike. Choose what fits, whether it’s unisex or gender-specific, to enjoy your winter adventures.

    How to Equip Yourself for Changing Winter Hiking Environments?

    Hiking in the cold needs smart gear choices. Picking gear for different winter temps is key. You need layers that you can add or take off. Start with your summer gear. Then add things for more warmth. Avoid the sun’s harsh rays. Even when it’s cold, they can harm your skin. Be safe at high spots with strong UV rays. Bring a device to call for help if you need it.

    Adjusting your gear for hikes in moderately cold (40-50 degrees) vs. freezing temperatures

    For a cold hike, dress in layers. This is the best plan. Always bring more warmth than you think you’ll need. It’s okay to layer summer clothes. Just add a warm hat, gloves, and a jacket. When it’s super cold, pick heavier coats. And don’t forget insulated pants. These keep legs warm.

    Tips for converting existing hiking gear for winter use

    You can use your summer gear in the cold. Just be wise about it. Put a warm fleece under your lighter jacket. Add thermal leggings under pants. Bring gear to protect your face and ears too.

    The importance of sun protection even during winter hikes

    The winter sun can still burn your skin. Always use a strong sunscreen. Wear sunglasses to guard your eyes. Keep your skin safe.

    Assessing and mitigating UV exposure risks at higher altitudes

    The higher you climb, the stronger the sun hits. Even in the cold. Pack gear that covers the skin and use sunscreen. Keep your eyes safe behind UV-blocking glasses. Stay safe from the sun as you climb higher.

    Essential emergency communication devices to carry on winter hikes

    Always hike with a way to call for help. Bring a phone or a radio. Make sure batteries can handle the cold. A device that sends your spot to rescue teams can be a lifesaver. Carry it for that ‘just in case’ moment.

    How Do You Select the Best Hiking Pants for Cold Weather?

    When hiking in cold weather, pants are key. You need to choose them well. For insulation and comfort, check the material and design of winter hiking pants. Softshell pants offer flexibility and breathability. They are a solid choice for active hikes in cold, but not too wet climates.

    Hardshell pants are your pick for harsh weather. They provide top protection from wind and water. Insulated trekking pants keep your legs toasty when the mercury drops. In chilly weather, fleece-lined trousers are a sure win. They trap heat close to your body. If the forecast says wet, add waterproof overpants to stay dry. Always tweak your choice based on weather and trail needs. Remember, the right pants can make your hike comfy and fun.

    How Can You Personalize Your Cold Weather Hiking Outfit for Optimal Comfort?

    When hiking in the cold, each piece of gear matters. For women, getting the best hiking pants for cold weather women’s style can mean a world of difference in comfort and mobility. These pants should fit well and allow you to move without feeling held back.

    Women’s specific winter hiking apparel often includes design touches that suit their body shapes better. This can be in the pants’ hip and waist areas or jackets tailored at the waist. The fit is not just about comfort but also about keeping warm air close to your body.

    Now, is unisex gear good enough? Sometimes, yes. If the fit is right and the gear keeps you warm, it might work perfectly. But women’s gear is made for women’s bodies. That can mean a better fit, more warmth, and more comfort on the trail.

    Let’s talk about your head. When it’s cold, you lose a lot of heat from your head. So, you need great hiking headwear for cold climates. Hats should cover your ears and stay snug on windy trails. They can also be a fun way to show your style!

    Your hands need attention too. Choose waterproof gloves for trekkers to keep your hands dry. Adding thermal liner gloves underneath gives more warmth. The liners can also work alone when you need to do tasks that require more finger flexibility.

    Remember, personalizing your outfit is about what works best for you. Mix and match until you feel ready for any chill the trail might throw your way.

    How Can You Personalize Your Cold Weather Hiking Outfit for Optimal Comfort?

    You want your outfit to work for you when hiking in the cold. Start with pants that let you move and keep you warm. The best women’s hiking pants for cold weather are the ones that fit well and shield you from the chill.

    Girls, look for clothes made just for you. They will fit better and keep you comfy. Take time to pick your pants. They are key for both warmth and easy hiking.

    Not all gear fits every person the same. You might like gear made for all, or gear made just for men or women. See what feels right for you.

    Your head and ears can get very cold fast. Choose a hat or beanie that covers well and keeps the heat in. Pair it with waterproof gloves for trekkers and you’ll be ready.

    Cold can sneak in fast. Keep it out with gloves that stay dry and have a warm layer inside. This way, you can wave goodbye to numb fingers on your hike.

    By using the right clothes, you make sure each hike is fun, not a freeze-fest.

    Choosing women’s specific apparel for cold weather hiking

    Women’s bodies are different from men’s, so it’s smart to pick clothes made just for ladies. This means jackets, pants, and base layers shaped to fit a woman’s curves. Better fit leads to better warmth and movement.

    The importance of selecting the right hiking pants for comfort and mobility

    The best hiking pants for cold weather women’s needs are both warm and allow you to move freely. They should have insulation but also stretch so you can climb and walk without feeling held back.

    Deciding between unisex and gender-specific outdoor clothing

    Unisex gear is okay, but it may not be as comfy. Gender-specific gear is tailored, fits better, and keeps you warmer. So, go for women’s specific winter hiking apparel when you can.

    Selecting headwear for adequate protection against cold climates

    Keep your head warm with hats made for cold hikes. Look for ones that cover your ears and block wind. Hiking headwear for cold climates is key to your overall comfort.

    Waterproof and thermal glove options for maintaining hand warmth

    Hands get cold fast, so choose the right gloves. Waterproof gloves for trekkers keep snow and rain out. Add thermal liner gloves beneath for extra warmth. This duo will keep your fingers toasty.

    Remember, comfort starts with the perfect fit and layers you can adjust. With these tips, your cold-weather hike will feel just right.

    How to Equip Yourself for Various Winter Hiking Scenarios?

    How do you hike in 30-degree weather? Dress in warm layers and keep dry. In moderately cold weather, like 40 to 50 degrees, you may want less insulation than you would for hiking in freezing temperatures. Start with a moisture-wicking base layer that pulls sweat away. Then, add an insulating layer like fleece for warmth. Top it off with a windproof and waterproof jacket. For colder, freezing hikes, consider thermal underwear and heavier insulation.

    You can use gear from summer hikes in winter. Add warm liners to gloves and socks for extra warmth. Turn a rain jacket into a wind barrier over a thick sweater. Zip in a fleece lining to a summer sleeping bag for winter camping.

    Even in winter, the sun can harm you. Wear sunglasses that block UV rays and apply sunscreen to exposed skin. Remember, snow can reflect sun rays and increase UV exposure, especially at high altitudes.

    At high places in the cold, UV risks grow. UV rays are stronger up high, and snow reflects them onto your skin. So, it’s key to protect every bit of skin with clothing and sunscreen. This even means getting a face mask or buff when the sun’s rays shine bright.

    Never skip on emergency devices while out in the winter wilds. Carry a whistle, a waterproof mobile phone, or even a satellite messenger. These can help a lot if you ever need to call for help.

    Remember, adjusting for various winter temps keeps you safe and comfy. Dress smart, protect your skin, and carry safety gear – enjoy your winter hike without worry!

    Conclusion

    In these posts, we learned key tips for staying warm and safe while hiking in cold weather. We looked at choosing the right boots, layering clothes, and picking the best pants. We covered winter hiking for beginners and safety practices. Always think about your health when hiking in the cold. Be ready for different winter hikes by picking the right gear. Remember, prepare well, and enjoy your adventure safely.

    Loading


  • An intrepid hiker conquering a snowy mountain peak with determination and expertise.

    When Should You Use Hiking Crampons on Your Trek?

    Looking for hiking crampons? Understand essential features, compatibility, and when to strap them on for safe outdoor adventures.

    • Hiking crampons feature longer spikes for challenging terrain, while microspikes are for less-steep ice and packed snow.
    • Crampons must fit your boots properly; use a compatibility chart and ensure stiff soles for attachment.
    • Use crampons on icy or packed snow trails; avoid using them on rock or soft ground to prevent trail damage and wear.
    • Key safety tips: learn to walk in crampons, check for damage before hikes, and only use on appropriate surfaces.
    • Maintain crampons by drying after use, avoiding rust, and tightening loose parts.
    • For different hiking scenarios, select from hybrid, step-in, or strap-on crampons based on terrain and boot compatibility; semi-rigid for uneven ice.
    • Always prioritize safety when choosing and using crampons on hikes.

    Embark on treks with confidence; know when to strap on those hiking crampons! Whether scrambling over icy trails or crossing glaciers, the right grip can make or break your adventure. In this post, we’ll uncover when crampons trump microspikes and ensure your boots are set for whatever lies ahead.

    Get ready to conquer diverse terrains with essential tips on using crampons for peak safety and performance. Ready to step up your hiking game? Let’s dive in!

    What Are the Essential Features of Hiking Crampons?

    Hiking crampons are more than just ice-walking accessories. They have unique features for various landscapes. The main difference between crampons and microspikes is in their spike length and build. Crampons are built with longer spikes and are designed for more challenging ice and mixed terrain. Microspikes have smaller spikes, and connecting chains, and are suited for packed snow and less steep ice.

    Hiking crampons should have points that stick into the ice to help you not slip. These points should be strong enough to grip ice but light so they don’t tire you out. For different places, you need crampons that match. Rocky paths need tough, rigid types. Snowy trails need ones with anti-balling plates to stop snow from sticking.

    Crampon types vary, so pick the right one for your trek. Mountaineers use ones with lots of points, while less techy hikers use ones with fewer points. Look for hiking crampons that can handle diverse terrains because you might face more than just ice. You’re on your way to grips that don’t give up and can cross lands that others can’t. Always think about the ground you’ll be on. That way, you’ll bring crampons that keep you safe and moving no matter the trek.

    How to Select the Right Crampons for Your Hiking Boots?

    Can you use crampons with regular hiking boots? Yes, but check if they fit right. Hiking boots and crampons must work together. Use a hiking boot and crampon compatibility chart to see what matches. Make sure the boots have stiff soles and can handle the crampon attachment methods.

    First, look at your boot’s sole. It needs to be tough to hold a crampon. A good fit is key to keeping you safe and stopping the crampon from slipping off. Test the crampon on your boot to make sure it attaches properly.

    Next, use the chart to find what kind of crampon you should get. There are different types, like those with straps or clips. They should be simple to put on and hold tight on your boots.

    Think about where you’ll hike. For rocky trails, look for strong crampons that won’t break. For snow, get ones that have big spikes for better grip. A step-by-step guide can show you how to try them on your boots. It can help you see if they’re a good match or not.

    If you run into trouble, troubleshoot the fit. Check for gaps or parts that pinch. Your crampons should not wobble on your boots. If they don’t seem right, get help or try a different pair.

    Picking the right crampons keeps you safe on ice and rocks. Take your time to choose well, and enjoy your hike without worry!

    When Should You Use Crampons During Your Hike?

    Are crampons good for hiking? Yes, they are when you’re facing icy or snowy trails. Crampons offer great grip and can stop you from slipping. They add spikes to your boots that dig into ice and snow. This means you stay safe on those slick paths.

    Identifying ideal conditions for crampon use on hikes

    The best time to wear crampons is when you hike on ice or packed snow. Look at the ground as you go. If you see ice coating the rocks and ground, it’s crampon time. This gear helps you cross glaciers, climb icy slopes, or trek across old snow fields.

    Advantages of crampons for ice and snow traction

    Crampons have metal spikes. These spikes sink into icy surfaces and keep you steady. No more slipping or sliding around. They fit over your hiking boots. This makes them easy to put on when you hit a tough spot.

    Scenarios where microspikes are preferred over crampons

    You don’t always need the big guns. For less tough ice and soft snow, microspikes work better. They are lighter and less sharp. They are great for trails that are icy but not too steep. This means you can walk with less weight on your feet.

    Assessing terrain to determine the need for crampons

    Always check out the path before you go. If it has steep ice or hard snow, bring crampons. If you’re not sure, it’s safe to take them just in case. It’s better to have them and not need them, than to need them and not have any.

    When you’re about to hit the trails, asking “When not to use crampons?” is key. Skip them on rock or soft ground. They can hurt the trail and wear down fast. Save them for when you have no choice but to cross ice or hard snow.

    What Are the Safety Precautions for Hiking with Crampons?

    When should you not use crampons? You shouldn’t when there’s no ice or snow. Now, let’s dig into this a bit more. You might think crampons are good for every winter hike. But that’s not true. On trips without ice or deep snow, they can be more harmful than helpful. They could even damage trails or your gear. So, what are the key safety tips?

    First off, learn how to walk in them before hitting the trail. It feels strange at first, like having claws on your feet. You must lift your feet higher to avoid tripping over the points.

    Next, always check your crampons before each trek. Look for any wear or damage. Make sure they still fit snugly on your boots, and the straps are not frayed. You want to trust them on slippery slopes.

    Never forget that crampons are for ice and hard-packed snow. They give great grip in freezing conditions. But in mud, rocks, or soft ground, leave them off. They won’t help and may cause a fall.

    Have a list of winter hiking needs ready too. Alongside crampons, pack warm clothes, food, and tools for navigation. Always have a first-aid kit.

    Remember, safety isn’t just about using crampons. It’s about knowing when they’re the right tool for your hike. If the trail asks for them, strap them on and enjoy the surefootedness they give. If it doesn’t, keep safe and crampon-free. Stay smart, and your hikes will be safe and stunning!

    How to Take Care of Your Crampons for Longevity and Performance?

    Routine maintenance for crampons? Yes, it keeps them ready for the trails. Dry them well after each hike. Keep them out of damp places to stop rust. Check spikes before and after use. Tighten loose parts, and replace worn spikes. This care makes your crampons last and ensures a secure grip on icy paths.

    When you get back from a hike, knock off any dirt first. Then, rinse your crampons in fresh water. To dry, place them in a warm, well-aired room but out of direct sunlight. Sun can harm the straps. Once dry, store crampons in a breathable bag. Avoid plastic bags that trap moisture.

    To prevent rust, and damage, treat your crampons with care. Look at them as you would a loyal pet. They keep you safe on your icy adventures, so give them the respect they deserve. For longer life, use a light coat of oil on the metal parts. But use oil that won’t harm the environment.

    Little checks like these can save you from a slip at the worst time. Be sure to look closely at the points for any sign of bending or dulling. If you see damage, it’s time for a fix or even a new set. Being on top of maintenance means you’ll never worry about your grip when you’re high up on a frosty peak. Keep your trusty spikes sharp, and they won’t let you down.

    What Crampon Systems Are Available for Various Hiking Scenarios?

    Can you use hybrid crampons for versatile hiking conditions? Yes, you can. Hybrid crampons are great because they fit different boot types. They have a heel lever and a toe strap, making them good for many hikes. For climbing ice or mixed terrain trails, go for step-in crampons. They need boots with a heel welt and offer the best hold.

    Strap-on crampons also have their spot in your gear closet. They use straps, so you can put them on most boots or shoes. Just be sure to get a snug fit. For the toughest trail days, pick semi-rigid crampons. They give more support and stability. These are less bendy than the flexible kind and help when you’re on uneven ice.

    When you’re picking crampon systems for hiking, think about where you’ll go. For varied ground, hybrid crampons are good. For ice walls or tough climbs, step-in designs give the firmest grip. Got no welts on your boots? Strap-on crampons are your friend. Keep in mind the firmness you need, too. Semi-rigid crampons are for sure-footed steps on tricky paths.

    So, there you have it. Choose your crampon system based on your hike’s needs. Safety always comes first. Rock those trails, and have epic adventures!

    Conclusion

    In this post, we covered key points about hiking crampons. You learned the essentials, from knowing when to pick crampons over microspikes to fitting them right on your boots. We explored the types of crampons for varied terrains and showed how to keep them sharp and ready. Remember, safety comes first when using these ice grippers. Choose the right system for your adventure. Happy trails and stay safe on icy paths!

    Loading


  • Winter adventurer conquering the cold in high-performance hiking pants amidst a breathtaking snowy landscape.

    Are Winter Hiking Pants Good for Cold Weather?

    Looking for winter hiking pants? Ensure they’re insulated, waterproof, and breathable for the best outdoor experience.

    • Essential features for winter hiking pants: insulation for warmth, waterproofing to stay dry, breathability to wick sweat, and a good fit for mobility.
    • Favor synthetic, stretchable, and fleece-lined fabrics for comfort, warmth, and durability.
    • Reputable brands like Outdoor Research offer quality winter hiking pants with customer satisfaction and technology such as Thinsulate and Gore-Tex.
    • Proper fit and comfort are crucial for warmth and ease of movement, with options like convertible pants for changing temperatures.
    • Balance warmth with weight using modern insulating materials; layering systems are effective.
    • Plus-size and varied body type options are available, ensuring a proper fit for all.
    • Durable winter hiking pants have reinforced areas and ripstop fabrics, with some also being eco-friendly.
    • Budget-friendly pants can be found on sale, through recommendations, or may warrant higher initial investment for longer-lasting quality.

    Hey, outdoor friends! Chilly trails are calling and you’re eyeing those winter hiking pants, right? Let’s talk about what makes a pair stand out. We need warmth, sure, but let’s not forget about staying dry and moving easily. Are your pants up to the task? Let’s dive in and find the perfect match that won’t leave you cold or soaked. Gear up and read on to make sure you’re ready for anything the winter wonderland throws your way.

    What Are the Key Features to Look for in Winter Hiking Pants?

    When venturing out on cold winter trails, having the right gear is essential. And one of the most important pieces of gear for winter hiking is a reliable pair of winter hiking pants. But what exactly should you look for in these pants to ensure maximum comfort and protection? Let’s explore the key features that make winter hiking pants a must-have for your outdoor adventures.

    Insulation: Keeping the Cold at Bay

    The primary function of winter hiking pants is to keep you warm in freezing temperatures. Look for pants that are specifically designed with insulation to trap heat and provide optimal warmth. Insulated hiking pants are made with materials that effectively retain body heat, allowing you to stay toasty even in the coldest conditions. This is especially important when the mercury dips below freezing and the chill becomes unbearable.

    Waterproof and Water-Resistant: Stay Dry in Wet Conditions

    Winter hiking often means encountering wet snow or heavy weather conditions. To ensure you stay dry and comfortable, it’s crucial to choose pants that have a waterproof or water-resistant shell. Waterproof pants are the best option for wet snow and heavy rain, as they provide an impenetrable barrier against moisture. However, if you anticipate lighter precipitation or want more breathability, a water-resistant pair of pants can also be suitable.

    Breathability: Stay Dry and Comfortable

    Even in cold weather, your body still sweats. That’s why it’s important to choose winter hiking pants that are breathable. Breathable pants allow moisture to escape, keeping your skin dry and preventing that clammy feeling. When your pants breathe, sweat evaporates, ensuring you stay warm and comfortable inside. Look for pants that have moisture-wicking properties and are made with breathable fabrics to enhance your overall hiking experience.

    Freedom of Movement: Fit Matters

    Comfort is key when it comes to winter hiking pants. A good fit goes beyond just feeling comfortable; it also allows you to move freely and easily. Whether you’re navigating steep climbs or taking long strides, pants that fit well won’t hold you back. Look for pants that have a flexible and stretchable fabric, allowing you to move with ease. This freedom of movement is essential for tackling challenging winter terrains without any restrictions.

    Embrace the Beauty of Winter Hiking

    Winter hiking may be tough, but it’s also incredibly rewarding. The cold, serene landscapes offer a unique and breathtaking experience. And having the right pair of winter hiking pants can make all the difference. With pants that keep you warm, and dry, and allow for unrestricted movement, you can conquer the cold and fully embrace the beauty of winter hiking.

    How Important Is the Material and Fabric in Winter Hiking Pants?

    When it comes to winter hiking pants, the material and fabric used play a crucial role in providing comfort, warmth, and durability. Let’s delve into the importance of these factors and how they contribute to a successful winter hiking experience.

    Synthetic Fabrics: The Perfect Choice for Cold Weather

    Synthetic fabrics such as nylon and polyester are commonly used in winter hiking pants. These materials are known for their ability to withstand cold temperatures and dry quickly. When snow or water comes into contact with these fabrics, they won’t stay wet for long, ensuring you stay dry and comfortable throughout your hike. Additionally, synthetic materials are highly durable, making them resistant to rips and wear, even in harsh winter conditions.

    Fleece Lining: The Ultimate Heat Trapper

    A fleece-lined interior is a key feature to look for in winter hiking pants. Fleece is a soft and insulating material that effectively traps heat. When combined with thermal trekking trousers, it enhances comfort and warmth, keeping you cozy in even the coldest environments. The fleece lining acts as a barrier against the cold, ensuring that your body heat stays trapped inside the pants.

    Stretchable Fabric: Freedom of Movement

    Freedom of movement is essential when hiking, especially in winter conditions. Pants that pinch or restrict movement can quickly become a hindrance. That’s why it’s important to choose winter hiking pants that have stretchable fabric. This allows for unrestricted movement, making it easier to navigate challenging terrains. Look for pants that offer flexibility and elasticity, ensuring a comfortable and enjoyable hiking experience.

    Durability: Built to Last

    Winter hiking often involves encounters with rocks, fallen branches, and other rough elements. That’s why durability is a crucial factor to consider when selecting winter hiking pants. Durable pants are less likely to tear or wear out when exposed to these challenging conditions. Look for pants made with sturdy fabrics that can withstand abrasions and impacts, ensuring they will last for many winter adventures to come.

    The Perfect Blend for Winter Hiking

    In summary, the material and fabric used in winter hiking pants are of utmost importance. Synthetic fabrics like nylon and polyester provide durability, quick-drying properties, and resistance to cold temperatures. A fleece lining adds an extra layer of insulation, trapping heat and keeping you warm in freezing conditions.

    Stretchable fabric ensures freedom of movement, allowing you to navigate winter terrains with ease. And, of course, durability is essential to withstand the rough elements of winter hiking. By choosing winter hiking pants that incorporate these features, you can enjoy a comfortable and successful hiking experience in the winter wonderland.

    What Are the Best Brands for Reliable Winter Hiking Pants?

    Choosing the right brand is crucial. You want pants that are reliable, durable, and capable of withstanding the harsh conditions of cold hikes. In this article, we will explore some of the best brands that blend quality with technology to provide you with the ultimate winter hiking experience.

    Outdoor Research: Trusted for Men’s Cold-Weather Pants

    Outdoor Research is a brand that consistently delivers high-quality winter hiking pants for men. Their pants are designed to withstand low temperatures and keep you warm and comfortable on your outdoor adventures. With a focus on durability and functionality, Outdoor Research pants are a go-to choice for many hikers facing cold weather conditions. Their reputation for excellence is backed by high ratings and positive customer reviews.

    Trusted Names for Women’s Waterproof Hiking Pants

    When it comes to women’s waterproof hiking pants, there are several trusted brands to choose from. These brands prioritize keeping you dry and protected from the elements. Look for names that have established themselves as leaders in the industry, such as Columbia, The North Face, and Patagonia. These brands offer a range of options that combine style, comfort, and functionality, ensuring you stay dry and comfortable throughout your winter hikes.

    Insulated Hiking Bottoms for Men: A Go-To Choice

    For men’s insulated hiking bottoms, the top-rated brands are worth considering. These brands have earned the trust of hikers by consistently delivering high-quality pants that provide optimal insulation and warmth. Look for brands like Arc’teryx, Mountain Hardwear, and Mammut.

    These brands utilize advanced insulation technologies, such as Thinsulate, to keep you warm even in the coldest temperatures. With their focus on both function and comfort, these brands are a reliable choice for your winter hiking needs.

    Customer Satisfaction and Service: A Priority for Popular Brands

    Popular brands in the winter hiking pants market prioritize customer satisfaction and service. They understand the importance of providing a positive experience for their customers and often offer warranties and excellent customer support. When you choose a reputable brand, you can have peace of mind knowing that they stand behind their products and are committed to your satisfaction.

    The Role of Technology in Winter Hiking Pants

    Today’s winter hiking pants incorporate advanced technologies to ensure your comfort and protection. Look for brands that utilize materials like Gore-Tex, which provides excellent waterproofing and breathability. These fabrics are designed to keep you dry and comfortable, even in wet and snowy conditions. Additionally, brands that prioritize durability use tough fabrics that are resistant to tearing, ensuring your pants will last for many winter adventures to come.

    Reputation Matters: Choose a Trusted Brand

    When it comes to winter hiking gear, a brand’s reputation is key. In cold conditions, you need pants that can handle the chill and keep you comfortable throughout your hike. By choosing a trusted brand with positive reviews and a strong track record, you can have confidence in the quality and performance of their products. These brands have proven their worth in snow and cold hikes, earning the trust of outdoor enthusiasts worldwide.

    Why Is Fit and Comfort Important When Selecting Winter Hiking Pants?

    Fit and comfort should be at the top of your priority list. The right fit and level of comfort can make or break your hiking experience in cold weather. In this article, we will explore why these factors are so important and how they can enhance your outdoor adventures.

    The Impact of Fit on Your Hike

    Imagine being out in the cold, trying to enjoy a hike, but your pants are either too tight or too baggy. Ill-fitting pants can restrict your movement, cause discomfort, and even cut your hike short. To ensure a pleasant and uninterrupted hiking experience, it’s crucial to find pants that fit you well.

    Ergonomic Design and Articulated Knees for Women’s Winter Hiking Pants

    For women, finding winter hiking pants with an ergonomic design and articulated knees can make a significant difference. These features allow for easier movement and less strain on your body. With pants that are specifically designed to accommodate the female form, you can climb, step, and navigate the trails with ease.

    The Importance of Straps and Adjustments

    Winter hiking pants with adjustable waistbands and ankle straps offer added convenience and functionality. These features allow you to customize the fit of your pants, regardless of the layers you may be wearing. By achieving a snug and secure fit, you can effectively keep the cold air out and trap the warmth inside, ensuring optimal comfort throughout your hike.

    Women’s Specific Winter Hiking Pants: Designed for a Better Fit

    Women’s specific winter hiking pants are tailored to fit the unique body shapes of women. These pants take into account curves and offer a better overall fit. By choosing pants that are designed specifically for women, you can ensure a more comfortable and functional hiking experience. Additionally, these pants may provide extra insulation in areas where it matters most, keeping you warm in critical areas.

    The Versatility of Convertible Hiking Pants

    Convertible hiking pants are a smart choice for cold climates and changing weather conditions. These pants feature zip-off legs, allowing you to easily transform them into shorts when the temperature rises or the sun comes out. This versatility ensures that you are prepared for whatever Mother Nature throws at you, whether it’s a chilly morning or a warm afternoon.

    The Safety and Warmth Factor

    Fit and comfort in winter hiking pants are not just about convenience and enjoyment; they also play a crucial role in your safety and warmth. Ill-fitting pants can lead to discomfort, chafing, and even potential injuries. On the other hand, properly fitting pants provide freedom of movement and reduce the risk of accidents. Additionally, pants that offer a comfortable and snug fit help to retain body heat, keeping you warm and protected from the cold elements.

    How Do You Balance Warmth and Weight in Winter Hiking Pants?

    Striking the right balance between warmth and weight is crucial. Men need pants that provide insulation and keep them warm without adding unnecessary bulk. In this article, we will explore how to achieve this balance by using modern materials and innovative technologies in winter hiking pants.

    Insulated Hiking Pants: Warmth Without the Weight

    For men’s winter hiking pants, insulation is key. However, it’s important to find pants that use modern materials to provide warmth without weighing you down. Look for pants that utilize advanced insulation technologies, such as Thinsulate or PrimaLoft. These materials are known for their ability to trap heat effectively while remaining lightweight. With the right insulation, you can stay warm and comfortable on your hikes without feeling weighed down.

    Lightweight Insulated Trekking Leggings: Ease of Movement

    In addition to warmth, men also seek lightweight insulated trekking leggings that allow for easy movement. These leggings are designed to provide insulation while ensuring freedom of movement on the trails. Look for pants that are made from lightweight and flexible materials, allowing you to hike with ease and agility. With the right pair of leggings, you can conquer any terrain without feeling restricted or hindered by your pants.

    The Role of Technology in Lightweight Winter Hiking Pants

    To achieve the perfect balance between warmth and weight, winter hiking pants often incorporate innovative technologies. These technologies are designed to maximize insulation while minimizing bulk. Look for pants that have thermal properties to keep you warm even in thin and lightweight designs. These pants utilize advanced materials and construction techniques to retain heat effectively, ensuring optimal warmth without sacrificing comfort or mobility.

    Layering: The Key to Cold Weather Comfort

    Layering is essential when it comes to staying comfortable in cold weather. By wearing multiple layers, you can adjust your clothing to different temperatures and weather conditions. For the best results, layer your winter hiking outfit with a base layer, insulated pants, and a shell layer. This layering system provides versatility and allows you to adapt to changing weather conditions, ensuring that you stay warm and comfortable throughout your hike.

    Determining Warmth-to-Weight Ratio: Checking the Specs

    To determine if a pair of pants will provide the right balance of warmth and weight, it’s important to check their specifications. Look for pants that provide information on the warmth-to-weight ratio. This ratio indicates how much warmth you can expect from the pants relative to their weight. By considering this information, you can make an informed decision and choose pants that meet your specific needs and preferences.

    What Options Are Available for Plus Size and Varied Body Types?

    What pants to wear for hiking in winter? Pants that fit well are key. You’ll find plus-size options in winter trekking pants, with brands offering lovely fits for all bodies, big or small. If you are on the hunt for pants, remember petite and tall winter hiking pants ranges are out there too. Let’s face it, every hiker’s shape is unique, and the trail calls for comfort that hugs your every move. That’s why stretchable winter hiking fabric is a must.

    Those who design women’s specific winter hiking pants get it; they are crafting gear that fits women just right. It’s not just about size; it’s about shape too. For the guys, the news is equally good. More and more, we see brands offering extended sizes for men and women.

    Trying on pants ensures the best fit. It may take a few tries to find that pair that feels like a second skin, providing warmth without the squeeze. And if the fit isn’t spot-on, remember return policies are your friend. They let you swap sizes until you nail the perfect one.

    When you find that pair that lets you move like the wind and still keeps the cold out? Well, that’s when you know you’ve hit the jackpot. Time to hit the trails and play in the winter wonderland with confidence and style!

    How Can You Ensure Durability and Protection in Winter Hiking Pants?

    When it comes to winter hiking, wearing durable and protective pants is essential. These pants are designed to withstand the elements and keep you warm in cold weather. In this article, we will explore how to ensure durability and protection in your winter hiking pants, while also considering the importance of sustainability.

    The Importance of Tough Fabric and Tear Resistance

    Winter hiking pants need to be made to last and provide protection against the cold. Look for pants that are constructed with tough fabric to prevent tears and abrasions. Additionally, consider pants made from ripstop fabric, as they are designed to prevent small tears from turning into larger ones. This feature ensures that your pants remain intact even in rugged terrain, providing long-lasting durability and protection.

    Waterproofing: Shielding Yourself from the Elements

    For hikes in windy, rainy, or snowy conditions, it’s crucial to have pants that can shield you from the elements. Look for pants with a waterproof layer to keep you dry and protected from rain and snow. This feature ensures that you can continue your hike without getting wet and uncomfortable. By choosing pants with proper waterproofing, you can stay warm and dry throughout your winter adventures.

    Durability: Choosing Pants That Can Take a Beating

    When hiking in cold weather, it’s wise to choose pants that are tough and can withstand the challenges of the trail. Durability is key, as it ensures that your pants will last longer and continue to provide protection over time. Look for pants that are made from high-quality materials and have reinforced areas where there is a lot of rubbing. These pants are designed to withstand the rigors of winter hiking and keep you comfortable and protected.

    Sustainability: Caring for the Earth

    While durability and protection are important, it’s also crucial to consider the environmental impact of your gear choices. Aim for pants that are made with sustainability in mind. Look for brands that use eco-friendly materials or prioritize longevity to reduce waste. By choosing pants that are both durable and environmentally conscious, you can enjoy your winter hikes while minimizing your impact on the planet.

    Comfort and Safety: The Ultimate Goal

    Ultimately, the right pair of winter hiking pants should provide both comfort and safety. They should allow for easy movement and flexibility while keeping you protected from harsh weather conditions.

    By selecting pants that prioritize durability, protection, and sustainability, you can embark on your winter adventures with confidence. When you find that perfect pair of pants that can withstand slides on rocks, snags on branches, and brushes with rough gear, all while keeping you comfortable, you’ll know you’re ready to conquer the trails, no matter what challenges winter throws your way!

    What Are Some Budget-Friendly Options for Winter Hiking Pants?

    There are budget-friendly options available that can still keep you dry and warm. In this article, we will discuss how to find pants that offer great value for your money without compromising on quality. Let’s dive in and discover the best bang for your buck!

    Take Advantage of Sales and Discounts

    One of the best ways to find affordable winter hiking pants is by keeping an eye out for sales and discounts. Many stores offer reduced prices on last year’s styles, which still provide the same level of quality and functionality. Visit your local outdoor stores or explore online retailers to uncover hidden gems waiting to be snagged at a lower cost. By taking advantage of these sales, you can find high-quality pants that fit your budget.

    Seek Advice from Experienced Hikers

    When searching for budget-friendly winter hiking pants, it’s always helpful to learn from those who have been there before. Reach out to fellow hikers and ask for their recommendations on affordable options.

    Hikers love sharing their knowledge and experiences, especially when it comes to finding good deals. They may be aware of brands that offer excellent quality without the hefty price tag. By tapping into their expertise, you can make informed decisions and find the perfect pair of pants that meet your needs and budget.

    Consider the Value of Investing a Bit More

    While budget-friendly options are important, sometimes it’s worth considering the value of investing a bit more in your hiking pants. Higher-priced pants often come with better materials and longer durability, making them a wise investment.

    Think of it as an investment in your outdoor gear collection. By purchasing a higher-quality pair of pants, you can enjoy their benefits for years to come, rather than repeatedly buying cheap pants that need to be replaced every season. It’s all about finding the right balance between affordability and long-term value.

    Conclusion

    In this post, we’ve looked at what to seek in winter hiking pants, from warmth to fit. We stressed insulation, waterproof materials, and breathability. The right fit ensures comfort, while brand reputation signals quality. Remember, good hiking pants balance warmth and weight and cater to all body types. They also need to stand up to tough trails. And, you don’t have to break the bank to get solid gear. Keep these tips in mind to find the perfect pair for your next cold adventure.

    Loading


  • Mesmerizing photo of a hiker equipped with winter gear navigating icy trails.

    Winter Hiking Safety: What Are the Non-Negotiable Essentials?

    Struggling with winter hiking safety? This guide details essentials, tips for beginners, and how to stay secure in the cold.

    • Winter hiking essentials: warm layers, signaling devices (whistles, mirrors), navigation tools (map and compass), and modified first aid kit (with thermal blankets, and hand warmers).
    • Preparation includes checking trails and weather, creating an itinerary, and getting physically fit.
    • Prevent hypothermia by dressing in layers, staying dry, and eating high-calorie foods; prevent frostbite by keeping skin covered and warm.
    • Navigation: use a map, compass, and GPS (with spare batteries), be aware of reduced visibility from winter darkness, and inform others of your plan.
    • Ice hiking: wear the right footwear (with crampons) and walk carefully.
    • Hydration/nutrition: drink regularly (using insulated flasks) and eat high-calorie snacks that won’t freeze.
    • Layering clothing: moisture-wicking base, insulating middle, wind-blocking outer layer.
    • Wildlife: maintain a distance and understand animal tracks; avalanches: know the risks and survival techniques.
    • Signaling in emergencies: visual (flares) and audio (whistles) devices, consider rescue insurance.
    • Advanced survival skills: fire-starting, shelter building, maintaining body heat, staying active, and consuming high-energy food and water.

    Are you ready to brave the chill and conquer the trails this winter? Before you step into the snowy wonderland, gear up with non-negotiable winter hiking essentials! Learn to layer like a pro, signal for help in emergencies, and navigate through icy landscapes. Here’s your guide to staying safe and enjoying every frosty step. Let’s get you prepped for an adventure where only the essentials make the cut!

    What Should You Include in Your Winter Hiking Safety Essentials?

    What are the non-negotiable items for winter hiking safety?
    The must-haves are warm layers, signaling devices, navigational tools, and a winter-ready first aid kit.

    Can beginners learn about winter hiking safety essentials?
    Yes, beginners can learn about winter hiking safety essentials with proper research and guidance.

    Learning to dress in layers is key. Start with a base layer that wicks sweat away. Add an insulation layer to keep warmth in. Top it off with a shell to block wind and wet. Materials like wool or synthetics work best as they keep you warm even when damp.

    Always carry a signaling device. This can be a whistle or a mirror, which you use to alert rescuers if you get lost.

    Bring navigational tools. A map and a compass are must-haves because GPS can fail in cold or remote areas.

    Change your first aid kit for winter. Add items like thermal blankets and hand warmers to deal with the cold. Don’t forget about extra meds and bandages as well.

    Be wise and well-equipped. It can make all the difference when braving the cold, wild outdoors.

    How Do You Prepare for a Winter Hike?

    Before a winter hike, you must check the trail and weather. Make sure to make an itinerary. You need to be fit and strong to hike in the cold.

    To answer “What should be done before embarking on a winter hike?” — know the trail, look up the weather, plan your route, and train your body. A winter hiking checklist should include gear for warmth, safety, and navigation.

    For a solid start, study the path you’ll take. Trail conditions can change fast in winter. Ice and snow may cover the ground. This makes it hard to walk. Knowing this, you can bring the right gear, like snowshoes or crampons.

    Always keep an eye on the weather forecasts. This can help you dodge bad storms. When the sky turns mean, it’s time to pack extra warm gear or change your plans.

    Your trip plan — or itinerary — is key. You should know how long you will hike each day. Let someone know this plan. If trouble hits, they will know where to look for you.

    And don’t forget your body needs to be ready. Winter hiking is tough. Start getting fit now with walks and strength training. This way your muscles can handle the extra work of hiking in the snow.

    So gear up, plan well, and get fit! This way you stand the best chance against Old Man Winter’s tricks.

    What Techniques Can Prevent Hypothermia and Frostbite?

    The best practices to prevent hypothermia include dressing warmly, staying dry, and eating high-energy foods. For frostbite, keep the skin covered and warm.

    Now, let’s jump into the details. Hypothermia prevention is critical. It happens when your body loses heat faster than it can make it. This can make your heart and nervous system shut down. To stop this, layer up. Start with a moist-wicking fabric close to your skin. Then add an insulating layer, like fleece, to trap warmth. The outer layer should block wind and wetness. This could be a waterproof, breathable jacket.

    For frostbite first aid, you need to act fast if your skin looks white or numb. Gently warm the area in warm water, not hot, for up to 30 minutes. Don’t rub the skin or walk on frostbitten feet, if that’s the case. After warming, wrap the area in a clean cloth for protection. If frostbite seems bad, get to a doctor as soon as possible.

    Thermal regulation techniques are key to staying safe. Move around to keep blood flowing but don’t sweat too much, as it can make you cold later. Drink plenty of fluids to stay hydrated. This might seem odd in the cold, but it’s vital. Eat energy-rich foods like nuts and energy bars. These foods help your body make heat.

    Remember, in cold weather, drink water and munch on snacks often. Keep your energy up so you stay warm. Use these tips to stay toastier out in the wild winter!

    What Are the Best Navigation Strategies in Winter Conditions?

    Navigation aids you should rely on during a winter hike include a map and compass, as well as GPS devices. Winter darkness affects trail navigation by reducing visibility, which makes it hard to stay on track.

    Let’s break that down. Always carry a map and compass. Know how to use them in case your tech fails. GPS devices are good but not perfect. They need power and a signal to work. Learn the land before you go. Marks on trees or big rocks can help when trails vanish under snow.

    Darkness comes early in winter. This means less time to hike in daylight. Good lights can help you see the trail in the dark. Still, it’s best to plan hikes to finish before night. Or know the trail well if you must hike in dark hours.

    Remember, tech can break or lose power in the cold. Carry spare batteries to stay safe. Always let someone know your hike plan too. This way, they can help if you get lost. Be ready for whiteouts. These are snow storms you can’t see through. If caught in one, find shelter. Wait until you can see well again before moving on.

    Using the right tools and knowing your limits keeps you safe. Stay on top trails and enjoy winter wonders with care.

    What Are the Necessary Ice Hiking Techniques?

    How can one safely hike over ice? Walk flat-footed and use gear that grips. To safely hike over ice, you need the right footwear and careful steps. It’s like you’ve got a secret power against slips. Ice hiking techniques include knowing how to walk and using tools for extra grip. A crampon usage guide helps a lot.

    What is the proper use of crampons and other ice hiking gear? Attach them snugly and step with care. Crampons need to fit your boots just right. You strap or clip them on so they won’t slip off. Once they’re on, you take slow, steady steps. Slip-resistant footwear for ice helps, too. Boots with deep grooves bite into the ice. They keep you standing when the ground tries to trip you up.

    To make sure you stay safe, always check if the ice is solid enough to walk on. For crampons, follow a step-by-step guide. It’s super important to get them on right. For footwear, choose boots made for ice. Look for ones with great grip and that keep your feet warm. Remember, safe ice hiking is all about being steady and prepared.

    How Can You Stay Hydrated and Nourished During Winter Hikes?

    What are the risks and solutions for hydration in cold weather? In cold weather, you don’t feel as thirsty. But you still need water to keep warm and energized. The answer is to drink often, even if you’re not thirsty. Use an insulated flask to keep your water from freezing.

    What food should be consumed on winter hikes? Choose high-calorie snacks. They give you energy and help your body stay warm. Foods that won’t freeze are best, like nuts or energy bars.

    Hydration is key when you hike in the cold. Your body loses water through sweat and breath. It can trick you because you might not feel like drinking. However not drinking enough can lead to dehydration. That’s why it’s important to take breaks and sip water, even when not thirsty.

    Insulating your water bottles or using containers designed for winter can keep your water in liquid form. Pack hot drinks in a thermos, and take sips regularly to add warmth and energy to your body.

    Now, let’s talk eats. What you scoff down during your hike can make or break your day. Winter hiking food ideas circle around high-calorie snacks. We need these calories to fuel our bodies in the cold. Think nuts, seeds, cheese, and chocolate. They pack a lot of energy and are less likely to freeze.

    Planning meals? Go for simple-to-make and eat foods. Good choices could be peanut butter sandwiches or pasta that can stay edible even in cold temps. Remember, food can stiffen or freeze. So, pack items that you can eat without much fuss, even when cold.

    To keep your food from freezing, store it close to your body. Body heat helps. Also, choose packaging that is easy to open with gloves on. You don’t want to struggle with tiny zips in the cold.

    Hydration and proper food are non-negotiable. They keep you going strong on winter trails. Remember, cold weather hydration and munching on those high-calorie snacks could save your hike and your health. Drink up, chow down, and hit the snowy trails with confidence.

    What Clothing Layers Are Essential for Winter Hiking?

    How should hikers layer for winter conditions? In short: with care. Use moisture-wicking base layers to keep sweat off your skin. Pick wool or synthetic materials. They work best. Add insulation layers to trap body heat. Use fleece or goose down for this. Your wind chill protection layer matters too. It keeps biting winds at bay.

    Base layers work like a second skin. They should pull sweat away from your body. This keeps you dry and warm. Materials like polyester or merino wool are top-notch choices for base layers. Why? Because they’re super at managing moisture and keeping you toasty.

    Now, let’s talk about the middle layer. It’s all about trapping air to keep you warm. For milder days, a light fleece works. When the mercury drops, you’ll want heavier insulation. Think puffy, insulated jackets.

    Wind chill can turn a hike into a risky business. That’s where your outermost layer comes in. It must block wind and let sweat escape. This way, you keep the chill out without getting damp from inside. Jackets with vents are great. They offer an extra way to control your body’s warmth.

    Remember this: Dressing right is your first step to a safe winter hike.

    How to Deal with Wildlife and Stay Safe in the Snow?

    The best way to deal with wildlife in winter is to watch from afar. Give animals space. To avoid avalanches, look for signs and follow trails. Animal tracks in the snow tell you what’s nearby.

    Safety tips for common wildlife encounters in snowy regions

    Always watch wildlife from a safe spot. Do not try to feed them. Loud noises can help scare them away if they get too close. Know which animals live in your hiking area. Some might be sleeping in winter, but others are still out.

    Basic avalanche safety measures every hiker should know

    Avalanches are serious. Learn about them before your hike. Check local reports for risk levels. Hiking in groups is safer. Avoid risky areas like steep slopes. If caught in an avalanche, try to swim to stay on top.

    How to identify and interpret animal tracks in the snow

    Animal tracks in snow share tales of who passed by. Look for clear, fresh tracks to see recent activity. Deer tracks have two parts and are pointed. Bear paw prints are big with claw marks. If you see many tracks together, it might be a group, and you should be careful. Remember, some tracks lead to food, but it’s not ours to take. Always keep your own safety in mind.

    What Emergency Signaling Should You Carry in Snow?

    What emergency signaling should you carry in the snow? Always have both visual and audio signaling devices. Flares and whistles are key.

    Snow hides you well. If you get stuck, you need a strong signal. A flare can be seen from afar. It tells people where you are. The bright light stands out against the snow. But flares are not toys. Only use them in real trouble. They show you need help fast.

    Carry a whistle, too. Sound travels far in quiet snow. Three short blows mean you’re in danger. Keep blasting, someone should hear.

    Is it worth getting rescue insurance before a winter hike? Yes, it’s smart. Rescue insurance can save your money and life. If a rescue team must come, the cost is high. Insurance pays for that. Always hope you don’t use it, but be glad if you do.

    Rescue teams work hard in bad snow. They help injured or lost hikers. When you have to call for help, you won’t have to worry about money. Your focus stays on staying safe. That peace of mind is worth the fee.

    What Advanced Winter Survival Skills Should a Hiker Know?

    The key survival skills for winter hiking are fire-starting, shelter-building, and maintaining body heat. To stay warm during activities in freezing temperatures, keep moving. This helps your body make its own heat.

    Fire-starting in wet conditions can be tough. But it’s key to warm up and dry clothes. You’ll need waterproof matches or a lighter, and dry kindling. In the snow, build a platform with logs. This stops the fire from sinking.

    For shelter, dig into the snow. A snow cave keeps you warm and out of the wind. Use a tarp and branches to make a quick lean-to. Always block the wind and stay dry.

    Building stamina for winter hikes means being active. Start with short hikes and go longer as you get stronger. Work on your legs and core. It makes hikes easier and keeps you warm. Always eat high-energy foods and drink water. Even if it’s cold, your body needs it to make heat and energy.

    In summary, master fire-making, build a strong shelter, stay active, eat well, and keep hydrated. These skills will keep you safe and warm on winter trails.

    Conclusion

    In this post, we’ve dug deep into what you need for safe winter hikes. Layer your clothes, carry a map, compass, and GPS for those tricky trails. Know how to spot frostbite and keep warm. Got crampons? Learn to use them right, and choose boots that grip the ice. Pack foods that give you power and won’t turn into ice blocks. Keep water handy so it doesn’t freeze. Meet wildlife? Stay calm and know your safety steps. And don’t forget, signal devices and rescue insurance—they’re big deals. Out there, with the right skills and gear, you’re set to enjoy and conquer the cold!

    Loading